

The introduction of GPT-3, significantly its chatbot type, i.e. the ChatGPT, has confirmed to be a monumental second within the AI panorama, marking the onset of the generative AI (GenAI) revolution. Though prior fashions existed within the picture era house, it’s the GenAI wave that caught everybody’s consideration.
Steady Diffusion is a member of the GenAI household for picture era. It’s identified for its chance to customization, freely obtainable to run by yourself {hardware}, and actively enhancing. It’s not the one one. For instance, OpenAI launched DALLE-3 as a part of its ChatGPTPlus subscription to permit picture era. However Steady Diffusion confirmed exceptional success in producing photos from textual content in addition to from different current photos. The current integration of video era capabilities into diffusion fashions supplies a compelling case for learning this cutting-edge know-how.
On this publish, you’ll be taught some technical particulars of Steady Diffusion and the best way to set it up by yourself {hardware}.
Let’s get began.
A Technical Introduction to Steady DiffusionPhoto by Denis Oliveira. Some rights reserved.
Overview
This publish is in 4 components; they’re:
How Do Diffusion Fashions Work
Arithmetic of Diffusion Fashions
Why Is Steady Diffusion Particular
Tips on how to Set up Steady Diffusion WebUI
How Do Diffusion Fashions Work
To know diffusion fashions, allow us to first revisit how picture era utilizing machines was carried out earlier than the introduction of Steady Diffusion or its counterparts at present. It began with GANs (Generative Adversarial Networks), whereby two neural networks interact in a aggressive and cooperative studying course of.
The primary one is the generator community, which fabricates artificial knowledge, on this case, photos, which are indistinguishable from actual ones. It produces random noise and progressively refines it by a number of layers to generate more and more lifelike photos.
The second community, i.e., the discriminator community, acts because the adversary, scrutinizing the generated photos to distinguish between actual and artificial ones. Its aim is to precisely classify photos as both actual or pretend.
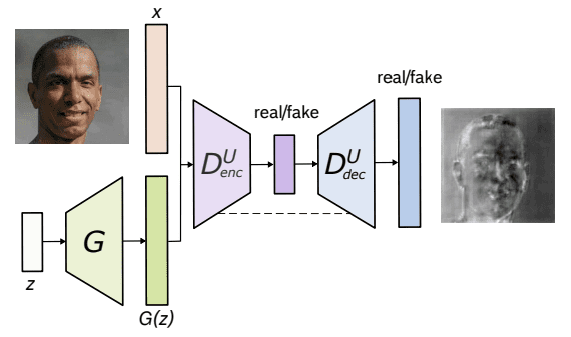
Structure of U-Web GAN. From Schonfeld et al. (2020)
The diffusion fashions assume {that a} noisy picture or pure noise is an end result of repeated overlay of noise (or Gaussian Noise) on the unique picture. This means of noise overlay is known as the Ahead Diffusion. Now, precisely reverse to that is the Reverse Diffusion, which includes going from a loud picture to a much less noisy picture, one step at a time.
Beneath is an illustration of the Ahead Diffusion course of from proper to left, i.e., clear to noisy picture.
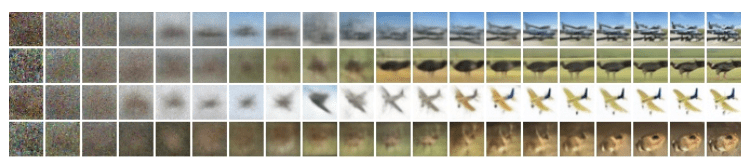
Diffusion course of. Picture from Ho et al. (2020)
Arithmetic of Diffusion Fashions
Each the Ahead and Reverse Diffusion processes observe a Markov Chain, which implies that at any time step t, the pixel worth or noise in a picture relies upon solely on the earlier picture.
Ahead Diffusion
Mathematically, every step within the ahead diffusion course of will be represented utilizing the under equation:
$$q(mathbf{x}_tmid mathbf{x}_{t-1}) = mathcal{N}(mathbf{x}_t;mu_t = sqrt{1-beta_t}mathbf{x}_{t-1}, Sigma_t = beta_t mathbb{I})$$
the place $q(x_tmid x_{t-1})$ is a standard distribution with imply $mu_t = sqrt{1-beta_t}x_{t-1}$ and variance $Sigma_t = beta_t mathbb{I}$, and $mathbf{I}$ is the identification matrix, photos (as a latent variable) in every step $mathbf{x}_t$ is a vector, and the imply and variance are parameterized by the scalar worth $beta_t$.

Ahead diffusion $q(mathbf{x}_tmidmathbf{x}_{t-1})$ and reverse diffusion $p_theta(mathbf{x}_{t-1}midmathbf{x}_t)$. Determine from Ho et al. (2020)
The posterior chance of all of the steps within the ahead diffusion course of is thus outlined under:
$$q(mathbf{x}_{1:T}mid mathbf{x}_0) = prod_{t=1}^T q(mathbf{x}_tmidmathbf{x}_{t-1})$$
Right here, we apply from timestep 1 to $T$.
Reverse Diffusion
Reverse diffusion, which is the alternative of the ahead diffusion course of, works equally. Whereas the ahead course of maps the posterior chance given the prior chance, the reverse course of does the alternative, i.e., maps the prior chance given the posterior one.
$$p_theta(mathbf{x}_{t-1}midmathbf{x}_t) = mathcal{N}(mathbf{x}_{t-1};mu_theta(mathbf{x}_t,t),Sigma_theta(mathbf{x}_t,t))$$
the place $p_theta$ applies reverse diffusion, additionally known as the trajectory.
Because the time step $t$ approaches infinity, the latent variable $mathbf{x}_T$ tends to an virtually isotropic Gaussian distribution (i.e., purely noise with no picture content material). The intention is to be taught $q(mathbf{x}_{t-1}mid mathbf{x}_t)$, the place the method begins on the pattern from $mathcal{N}(0,mathbf{I})$ known as $mathbf{x}_T$. We run the entire reverse course of, one step at a time, to achieve a pattern from $q(mathbf{x}_0)$, i.e., the generated knowledge from the precise knowledge distribution. In layman’s time period, the reverse diffusion is to create a picture out of random noise in lots of small steps.
Why Is Steady Diffusion Particular?
As an alternative of straight making use of the diffusion course of to a high-dimensional enter, Steady diffusion tasks the enter right into a lowered latent house utilizing an encoder community (that’s the place the diffusion course of happens). The rationale behind this strategy is to scale back the computational load concerned in coaching diffusion fashions by dealing with the enter inside a lower-dimensional house. Subsequently, a standard diffusion mannequin (resembling a U-Web) is used to generate new knowledge, that are then upsampled utilizing a decoder community.
Tips on how to Set up Steady Diffusion WebUI?
You should use secure diffusion as a service by subscription, or you may obtain and run in your laptop. There are two main methods to apply it to your laptop: The WebUI and the CompfyUI. Right here you can be proven to put in WebUI.
Be aware: Steady Diffusion is compute heavy. Chances are you’ll want an honest {hardware} with supported GPU to run at an affordable efficiency.
The Steady Diffusion WebUI package deal for Python programming language is free to obtain and use from its GitHub web page. Beneath are the steps to put in the library on an Apple Silicon chip, the place different platform are largely the identical as nicely:
Conditions. One of many stipulations to the method is having a setup to run the WebUI. It’s a Python-based internet server with the UI constructed utilizing Gradio. The setup is usually automated, however it’s best to be certain that some fundamental parts can be found, resembling git and wget. Whenever you run the WebUI, a Python digital atmosphere might be created.In macOS, you might wish to set up a Python system utilizing Homebrew as a result of some dependencies may have a more moderen model of Python than what the macOS shipped by default. See the Homebrew’s setup information. Then you may set up Python with Homebrew utilizing:
brew set up cmake protobuf rust python@3.10 git wget
brew set up cmake protobuf rust python@3.10 git wget
Obtain. The WebUI is a repository on GitHub. To get a replica of the WebUI to your laptop, you may run the next command:
git clone https://github.com/AUTOMATIC1111/stable-diffusion-webui
git clone https://github.com/AUTOMATIC1111/stable-diffusion-webui
It will create a folder named stable-diffusion-webui and it’s best to work on this folder for the next steps.
Checkpoints. The WebUI is to run the pipeline however the Steady Diffusion mannequin is just not included. It’s essential to obtain the mannequin (also called checkpoints), and there are a number of variations you may select from. These will be downloaded from numerous sources, mostly from HuggingFace. The next part will cowl this step in additional element. All Steady Diffusion fashions/checkpoints must be positioned within the listing stable-diffusion-webui/fashions/Steady-diffusion.
First run. Navigate into the stable-diffusion-webui listing utilizing the command line and run ./webui.sh to launch the online UI. This motion will create and activate a Python digital atmosphere utilizing venv, routinely fetching and putting in any remaining required dependencies.
Python modules put in in the course of the first run of WebUI
Subsequent run. For future entry to the online UI, re-run ./webui.sh on the WebUI listing. Be aware that the WebUI doesn’t replace itself routinely; to replace it, you must execute git pull earlier than operating the command to make sure you’re utilizing the newest model. What this webui.sh script does is to start out an internet server, which you’ll be able to open up your browser to entry to the Steady Diffusion. All of the interplay must be completed over the browser, and you may shutdown the WebUI by shutting down the online server (e.g., urgent Management-C on the terminal operating webui.sh).
For different working programs, the official readme file gives the perfect steerage.
Tips on how to Obtain the Fashions?
You may obtain Steady Diffusion fashions through Hugging Face by deciding on a mannequin of curiosity and continuing to the “Information and variations” part. Search for information labeled with the “.ckpt” or “.safetensors” extensions and click on the right-facing arrow subsequent to the file measurement to provoke the obtain. SafeTensor is another format to Python’s pickle serialization library; their distinction is dealt with by the WebUI routinely, so you may think about them equal.
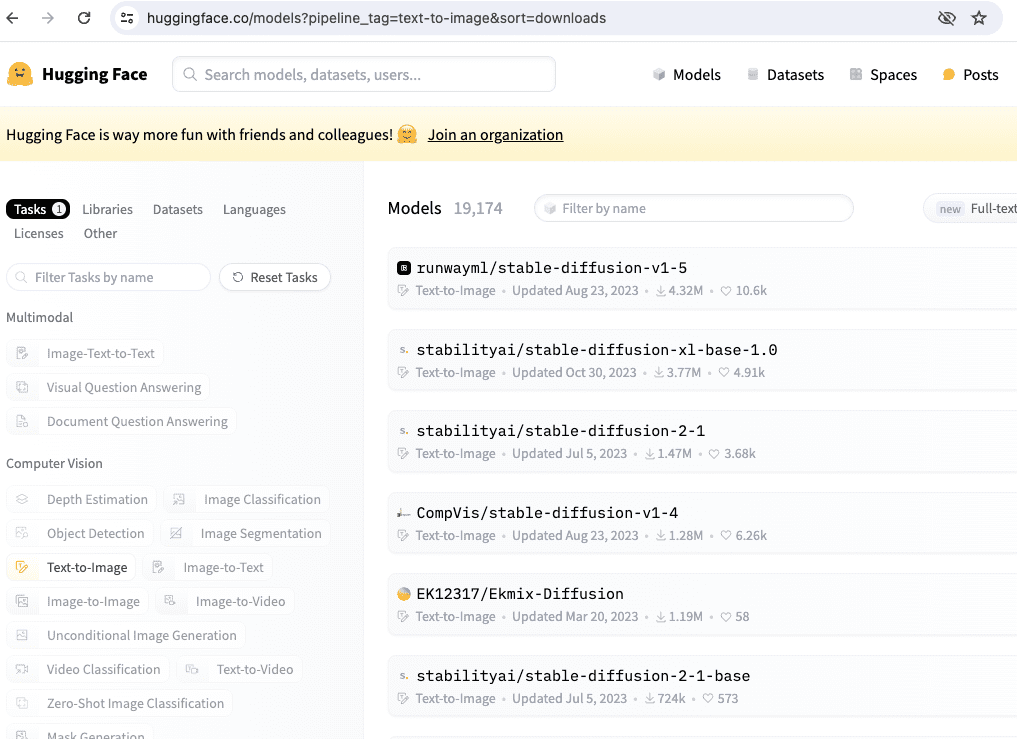
There are a number of fashions from Hugging Face should you search by the mannequin title “stable-diffusion”.
A number of official Steady Diffusion fashions that we might use within the upcoming chapters embrace:
Steady Diffusion 1.4 (sd-v1-4.ckpt)
Steady Diffusion 1.5 (v1-5-pruned-emaonly.ckpt)
Steady Diffusion 1.5 Inpainting (sd-v1-5-inpainting.ckpt)
A mannequin and configuration file are important for Steady Diffusion variations 2.0 and a couple of.1. Moreover, when producing photos, make sure the picture width and top are set to 768 or larger:
Steady Diffusion 2.0 (768-v-ema.ckpt)
Steady Diffusion 2.1 (v2-1_768-ema-pruned.ckpt)
The configuration file will be discovered on GitHub on the following location:
After you downloaded v2-inference-v.yaml from above, it’s best to place it in the identical folder because the mannequin matching the mannequin’s filename (e.g., should you downloaded the 768-v-ema.ckpt mannequin, it’s best to rename this configuration file to 768-v-ema.yaml and retailer it in stable-diffusion-webui/fashions/Steady-diffusion together with the mannequin).
A Steady Diffusion 2.0 depth mannequin (512-depth-ema.ckpt) additionally exists. In that case, it’s best to obtain the v2-midas-inference.yaml configuration file from:
and put it aside to the mannequin’s folder as stable-diffusion-webui/fashions/Steady-diffusion/512-depth-ema.yaml. This mannequin features optimally at picture dimensions of 512 width/top or larger.
One other location that you will discover mannequin checkpoints for Steady Diffusion is https://civitai.com/, which you’ll be able to see the samples as nicely.
Additional Readings
Beneath are a number of papers which are referenced above:
Abstract
On this publish, we discovered the basics of diffusion fashions and their broad utility throughout numerous fields. Along with increasing on the current successes of their picture and video era successes, we mentioned the Ahead and Reverse Diffusion processes and modeling posterior chance.
Steady Diffusion’s distinctive strategy includes projecting high-dimensional enter right into a lowered latent house, decreasing computational calls for through encoder and decoder networks.
Shifting ahead, we’ll be taught the sensible features of producing photos utilizing Steady Diffusion WebUI. Our exploration will cowl mannequin downloads and leveraging the online interface for picture era.


")

")


/cdn.vox-cdn.com/uploads/chorus_asset/file/25661290/Screenshot_2024_10_06_at_10.48.36_AM.png "Trailers of the week: Nosferatu, The Franchise, and Squid Game 2")


