

Launching the Secure Diffusion Internet UI could be performed in a single command. After that, you may management the picture era pipeline from a browser. The pipeline has a whole lot of shifting components and all are essential in a method or one other. To successfully command Secure Diffusion to generate photos, you need to acknowledge the widgets out of your browser and know what they’ll do. On this publish, you’ll be taught the various elements within the Secure Diffusion Internet UI and the way they have an effect on the picture you create.
Let’s get began.
The right way to Create Pictures Utilizing Secure Diffusion Internet UIPhoto by Kelly Sikkema. Some rights reserved.
Overview
This publish is in 4 components; they’re:
Launching the Internet UI
The txt2img Tab
The img2img Tab
Different Features
Launching the Internet UI
After you ready your Python surroundings, downloaded the net UI code, and saved the mannequin checkpoints within the acceptable listing, you may launch the net UI utilizing the next command:
The net UI could be personalized by enhancing the variables in webui-user.sh. One instance is to permit the net UI server to run from one laptop whilst you launch your browser from one other, which you might want to add the next line to webui-user.sh to permit the server to be accessed over the community:
export COMMANDLINE_ARGS=”–listen”
export COMMANDLINE_ARGS=“–listen”
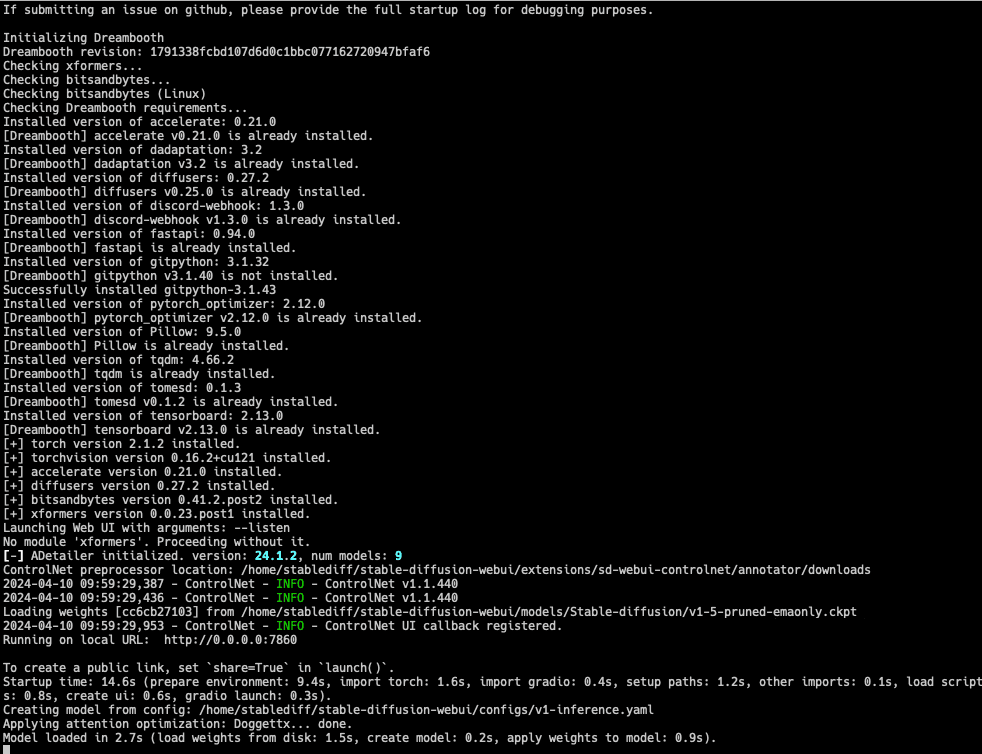
Working ./webui.sh will launch a server for Secure Diffusion
By default, the command ./webui.sh will launch a server at port 7860, and you’ll entry it out of your browser. When you run it out of your desktop, you should utilize the URL http://127.0.0.1:7860; however whether it is from one other laptop, you might want to use that laptop’s IP deal with as a substitute of 127.0.0.1. Your browser ought to present an UI like the next:

The Secure Diffusion net UI
On the prime left nook, you may see a dropdown field to pick the checkpoint. The checkpoint present totally different type of drawing, comparable to extra reasonable like {a photograph} or extra like a cartoon. You may retailer a number of checkpoints within the mannequin listing however just one is used within the pipeline. Beneath the dropdown, you could have a number of “tabs” which you can generate picture in another way. Every tab has totally different set of widgets. Most of them are to supply parameters to a era pipeline.
Let’s perceive what knobs and parameters can be found to generate a desired picture. These parameters, collectively, assist nudge the algorithm in the appropriate route.
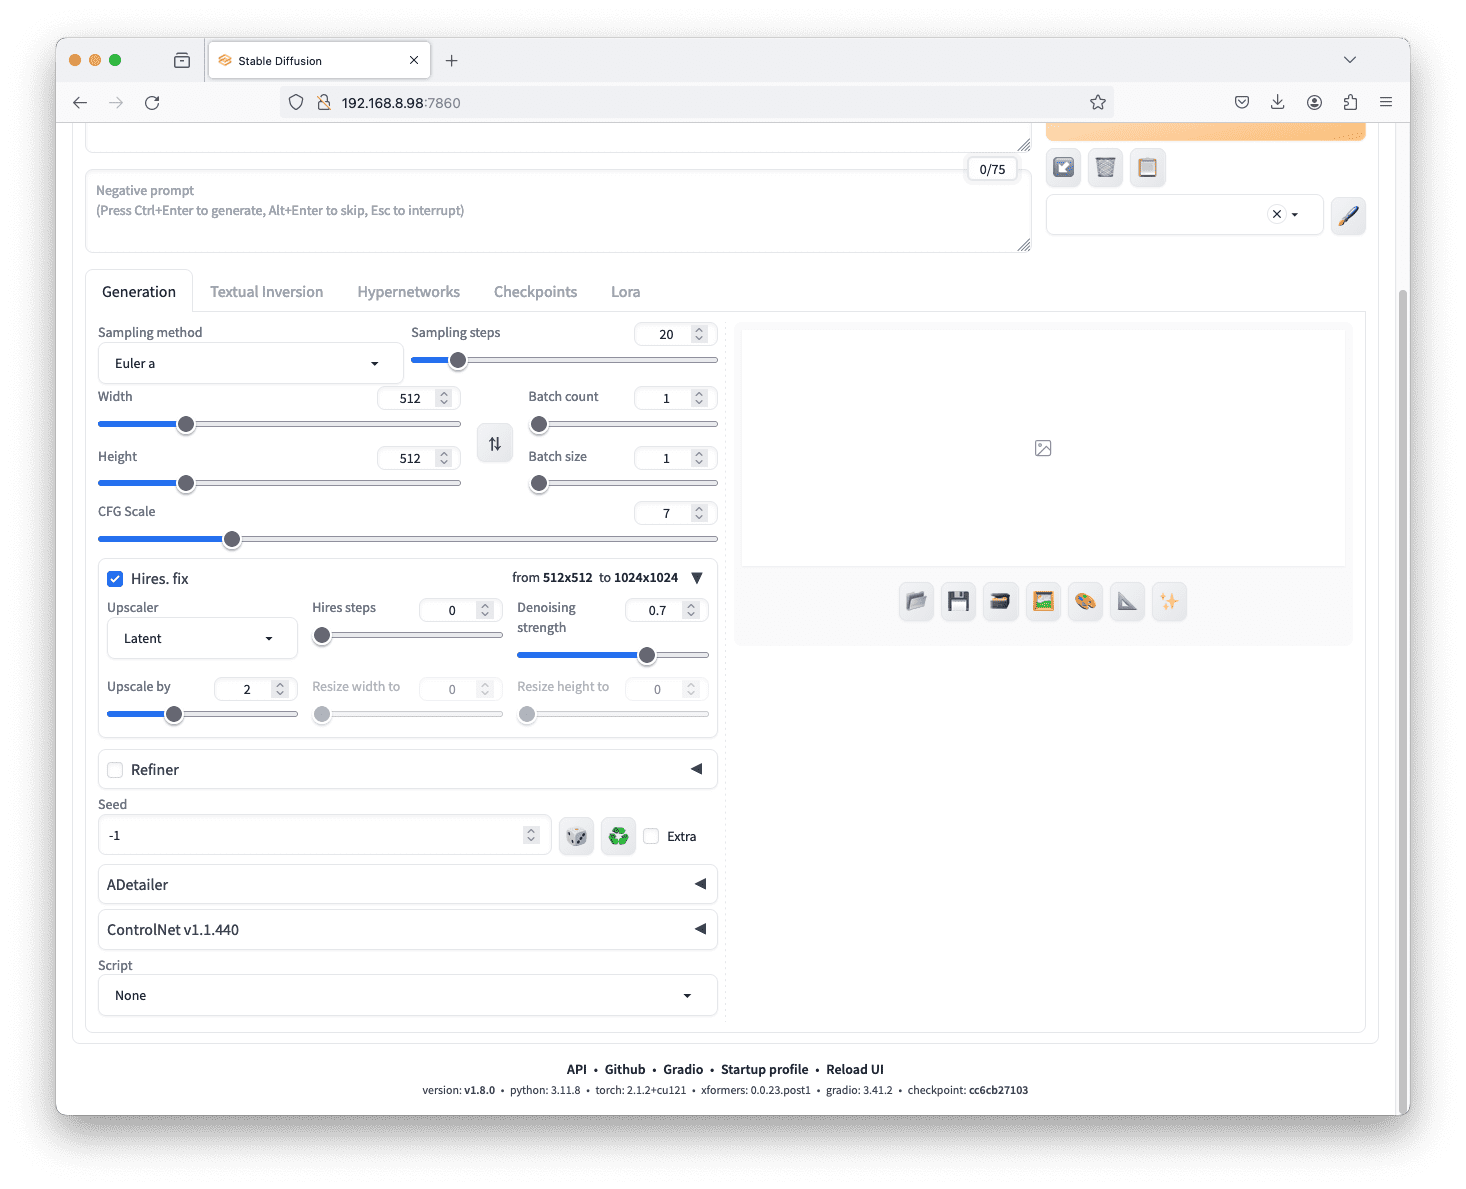
The txt2img Tab
The launch web page of the UI reveals the txt2img tab—a basic function of Secure Diffusion for reworking textual content prompts into photos. Because the identify suggests, this permits us to explain the picture we would like or don’t need as textual content to the algorithm, which then converts it into an embedding vector to generate the picture. Check with the screenshot above, you could have the widgets as defined as the next.
Checkpoint as labeled by ①. This dropdown menu lets us choose fashions. Be sure that mannequin recordsdata are positioned within the right folder, as detailed within the mannequin set up tips (coated within the final chapter). A buffet of checkpoints and safe-tensors is on the market at https://civitai.com/.
Refresh Button as labeled by ②. Discovered subsequent to the checkpoint dropdown, this button updates the checklist of obtainable fashions. It’s used to refresh the checklist should you added a brand new mannequin to the checkpoint folder however don’t wish to restart the net UI server.
Immediate Textual content Field as labeled by ③. That is the place the place the outline of the anticipated picture goes. Offering detailed and particular prompts (which shall be coated intimately within the subsequent publish), together with key phrases, enhances the era course of.
Destructive Immediate Textual content Field as labeled by ④. Optionally available however essential when using v2 fashions, the destructive immediate helps specify what shouldn’t be part of the photographs. Usually, what we don’t need is much less particular and could be saved for a lot of use circumstances.
Sampling Methodology and Steps as labeled by ⑤ and ⑥. The primary diffusion algorithm requires greater than 100 steps to create a picture however we discovered methods to hurry up. These parameters decide the denoising course of algorithm and the variety of sampling steps. The selection of sampling technique influences the steadiness between pace and high quality.To steadiness pace, high quality, and having good convergence, DPM++ 2M Karras with 20 – 30 steps or UniPC with 20-30 steps are some good choices. However, DPM++ SDE Karras with 10-15 steps or DDIM with 10-15 steps provide probably the greatest high quality photos however with slower convergence.
Width and Top as labeled by ⑦ and ⑧. They specify the output picture measurement, making certain compatibility with the chosen mannequin. Changes are really useful based mostly on whether or not v1 or v2 fashions are used. Normally you retain the default of 512×512 pixels and you modify it solely if you’d like a distinct facet ratio.
Batch Depend and Measurement as labeled by ⑨ and ⑩. These settings management the occasions the picture era pipeline runs and the variety of photos generated per run. The batch measurement is what number of photos are generated in a single single era. The batch depend is the variety of generations.A batch measurement of 1 with the next batch depend is really useful to generate a number of higher-resolution photos with the least consumption of peak sources. It’s slower, however the high quality of the photographs is far larger than simply working batches of 512×512 photos.For the reason that picture era is a random course of, producing a number of photos in batches lets you choose the very best final result from a number of.
Classifier Free Steering Scale as labeled by ⑪. The Classifier Free Steering (CFG) scale parameter permits us to regulate how a lot the mannequin ought to adhere to the immediate, starting from largely ignoring it (worth of 1) to strictly following it (worth of 30). Speaking about extremes, a really low worth of CFG rating would imply that the immediate is usually disregarded and the picture generated is random. This won’t serve the aim of utilizing txt2img. However, a excessive worth of CFG forces the system to stay to the immediate however may distort the picture itself. That is analogous to overfitting the immediate.
Random seed as labeled by ⑫. The seed worth influences the preliminary random tensor within the latent area, controlling the picture’s content material. Fixing the seed is helpful for sustaining reproducibility whereas tweaking prompts.
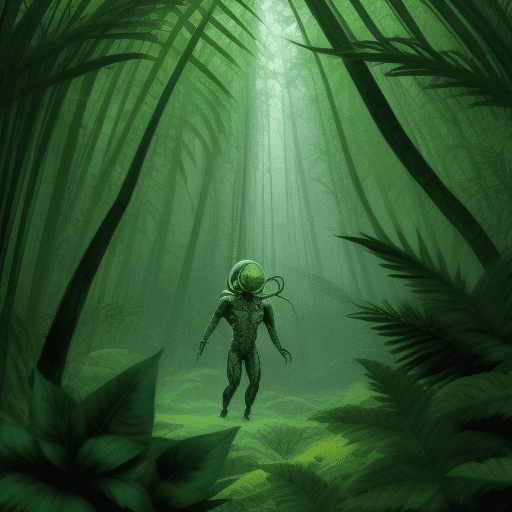
You may attempt it out by describing what you wish to generate within the immediate field (in plain English until you changed the default embedding mannequin). When you arrange these and click on the “Generate” button at prime proper, you may see the Secure Diffusion mannequin create photos for you progressively. Beneath an an instance for the immediate “Extraterrestrial exploring a jungle”, with all different parameters as default.
As talked about above, the picture generated is within the measurement as specified by the width and peak parameters. When you want a picture greater than that, you may verify the “Hires. repair” (high-resolution repair) field, and click on one the triangle to increase the field for extra choices:
Parameters below “Hires. repair”
This is applicable a super-resolution deep studying mannequin to the output of Secure Diffusion. It addresses the native decision limitation of Secure Diffusion, offering an upscaling function for photos generated at a smaller measurement. We will select from varied upscaling and adjustment parameters comparable to “upscale by” (the a number of for width and peak of the picture) to realize the specified outcomes.
Selecting the very best photos from the batch after which resizing from the img2img tab to upscale the decision is mostly really useful, quite than asking the Secure Diffusion mannequin to generate a large output instantly.
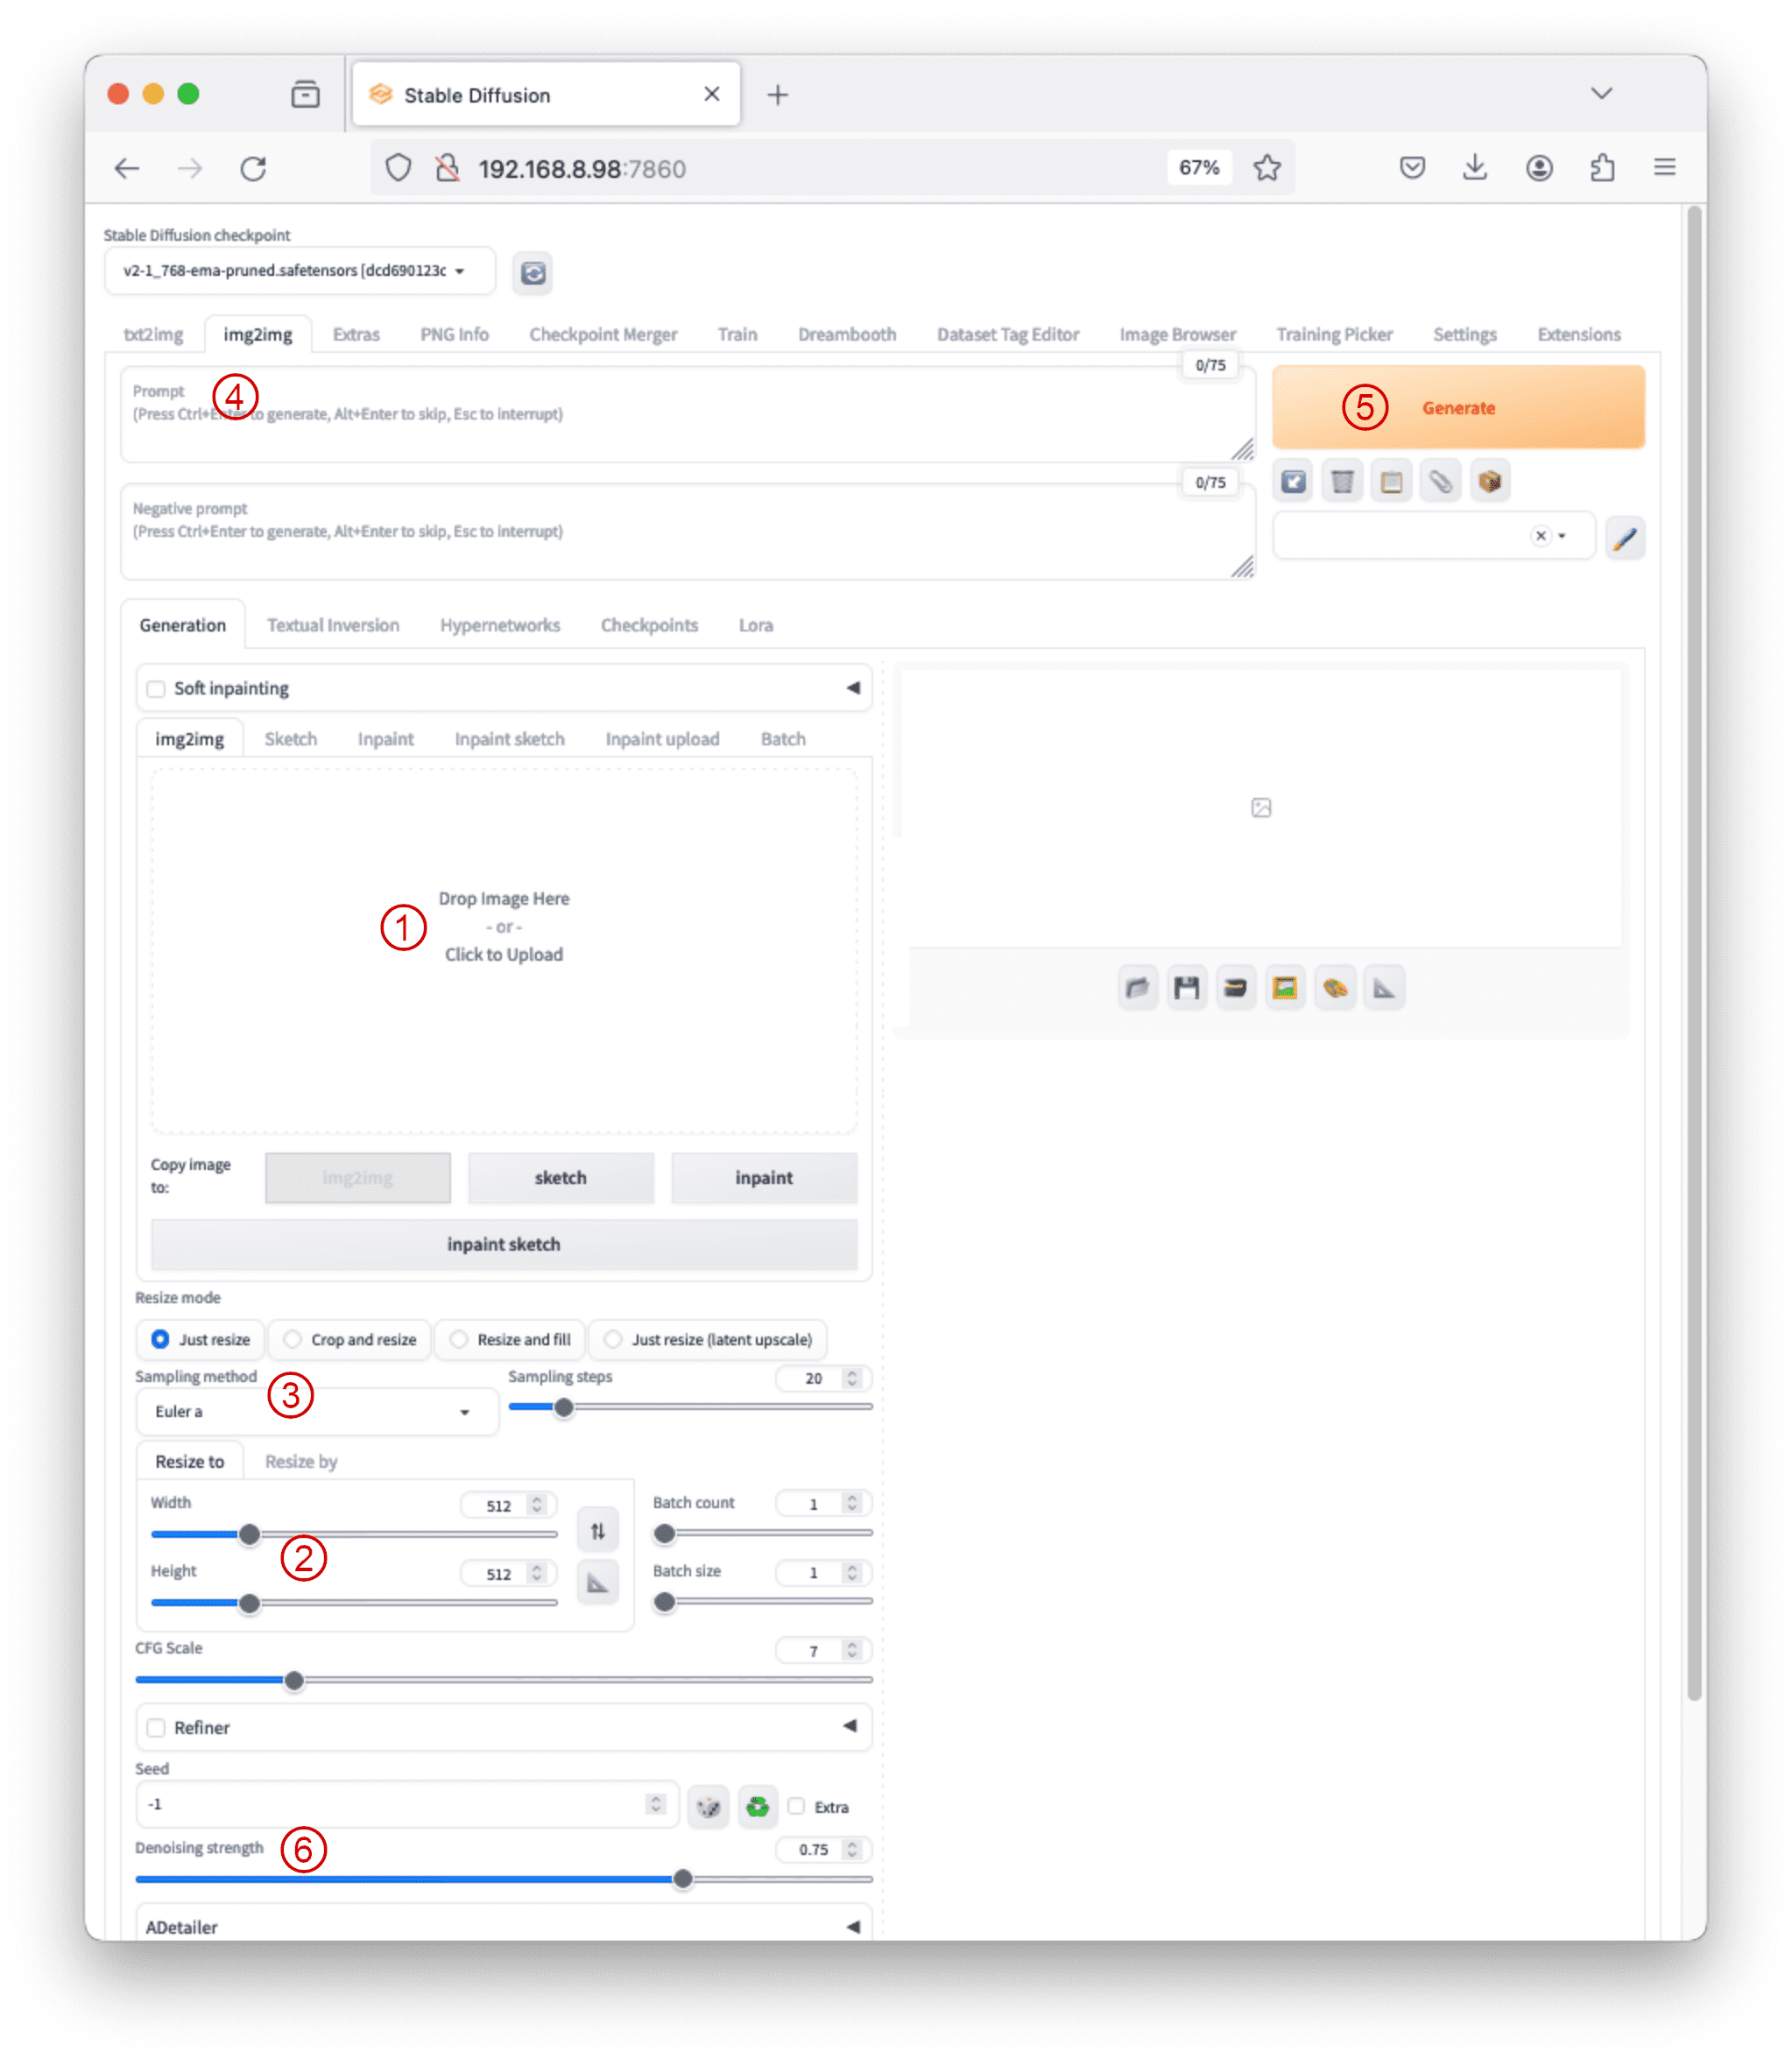
The img2img Tab
Subsequent to the txt2img tab, the img2img tab is the place customers leverage image-to-image features. Widespread use circumstances embrace inpainting, sketching, and reworking one picture into one other.
Whilst you nonetheless see the immediate and destructive immediate textual content field, the img2img tab permits customers to carry out image-to-image transformations. A typical course of entails:
Dragging and dropping a base picture onto the img2img subtab below “Technology” part
Adjusting width or peak to keep up the facet ratio of the brand new picture.
Setting sampling technique, sampling steps, and batch measurement.
Writing a immediate for the brand new picture.
Urgent the Generate button to create photos, with denoising power changes.
Different parameters within the img2img tab embrace resizing mode and denoising power, controlling how a lot the picture modifications through the transformation.
A typical workflow with img2img
Some of the essential settings is the denoising power. It signifies the quantity of creative freedom the mannequin has over the enter picture. A low worth of this parameter signifies that the type of the picture have to be retained whereas the next worth means the least restriction by way of styling, colours, and many others.
Allow us to perceive this higher utilizing two examples with the identical enter immediate “lady sporting sun shades” under:
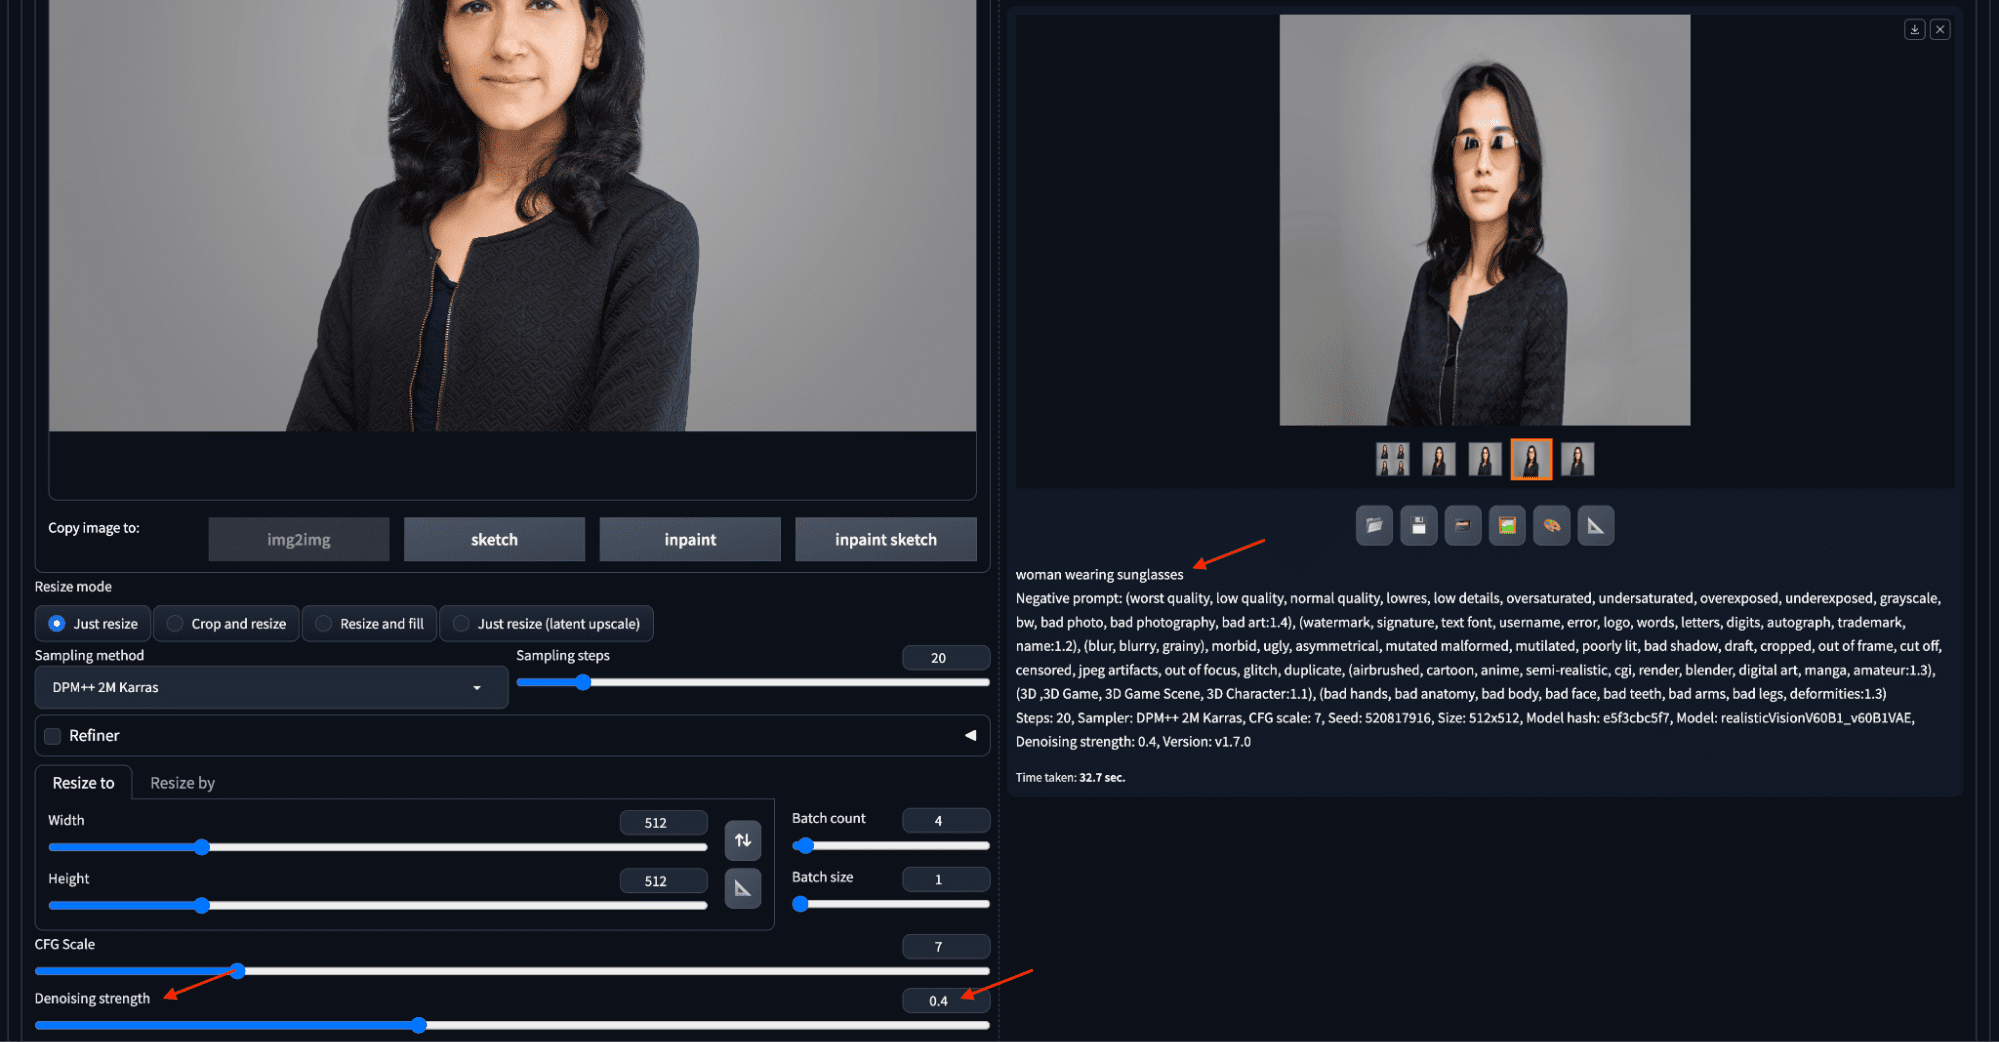
Utilizing img2img to make a headshot to put on sun shades.
Within the first instance, a picture is uploaded to the img2img subtab, the denoising power is ready to 0.4, entered the immediate, then clicked “Generate”. The picture generated will present on the proper. The generated picture retained nearly all the things besides the face, together with the enter picture’s coloration and elegance. It precisely displays the instruction on the immediate: sporting sun shades.
The second instance has the next worth of denoising power of 0.7, thus permitting the algorithm to generate extra random photos. Let’s additionally set the batch depend to 4 so to create extra outputs. The colour, pose, and elegance are all totally different within the 4 candidate photos on the appropriate, as follows:
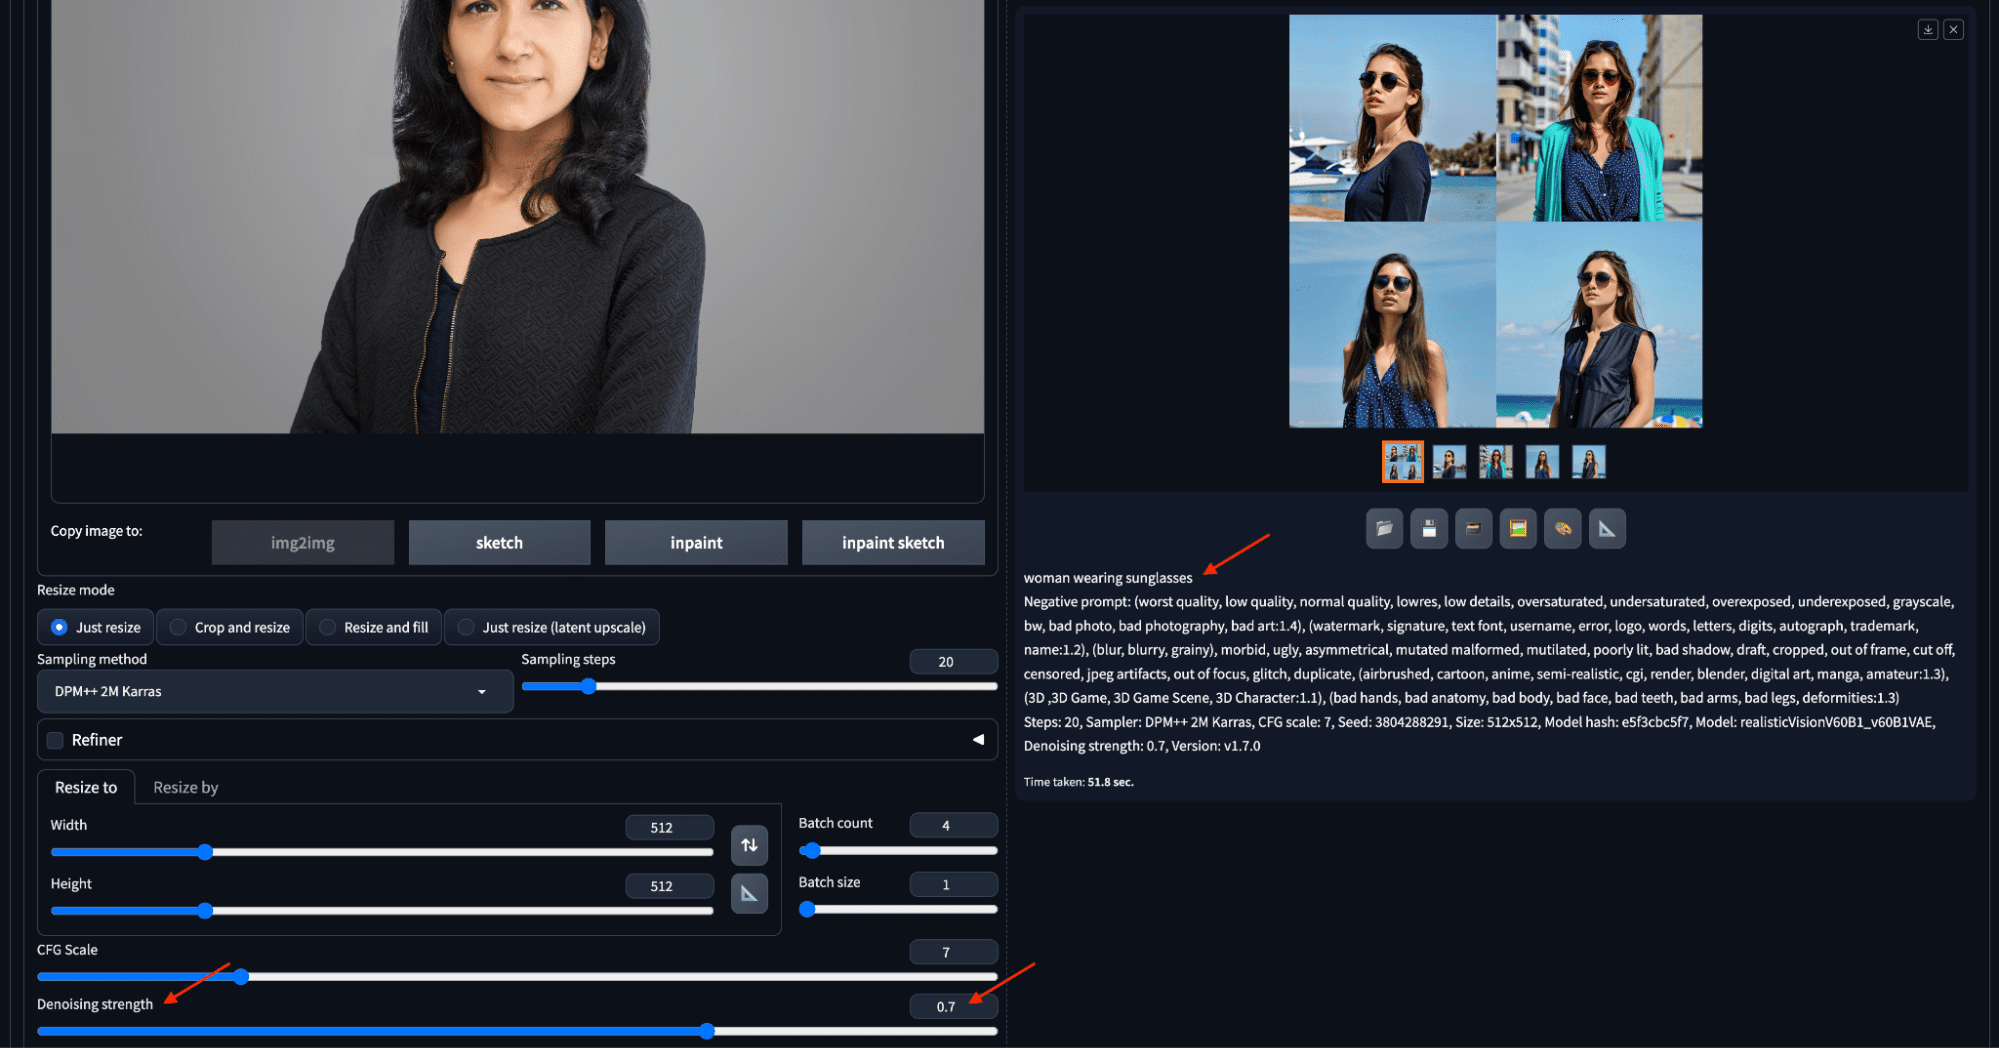
Rising the denoising power will generate photos extra deviated from the enter.
Sketch and Inpainting
Along with importing a picture, customers can sketch the preliminary image utilizing the colour sketch software, enabling artistic modifications or completely new compositions. The sketch operate permits customers to enter a background picture, sketch in coloration, and generate photos based mostly on the sketch and accompanying immediate.
A broadly used operate within the img2img tab is inpaint, which addresses minor defects in generated photos. Apart from importing a picture, you may as well ship a picture generated from the txt2img tab to the img2img tab for inpainting. Afterward, you may draw on the picture to create a masks. Changes to denoising power, masks content material, and batch measurement affect the inpainting course of, too. An instance is as follows:
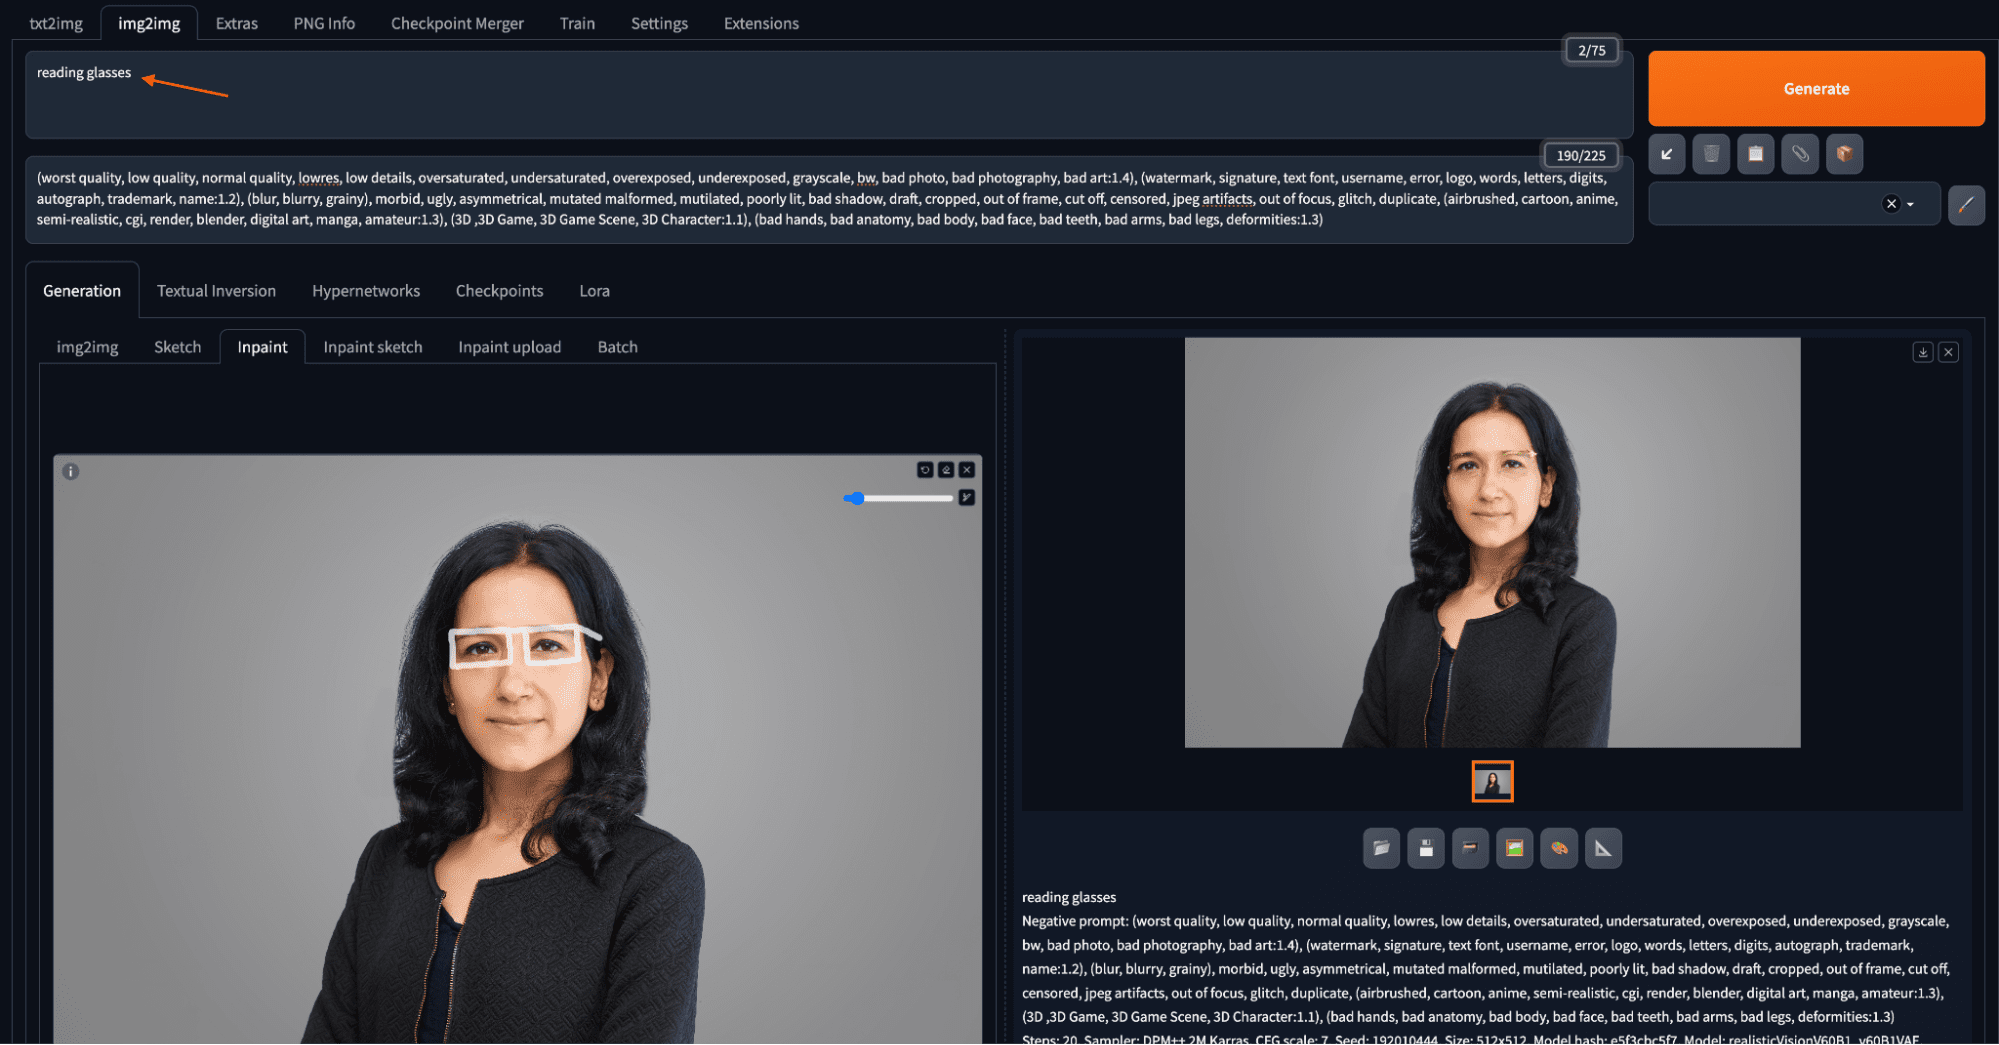
Add a studying glass to a portrait by inpainting
You draw a masks on the enter picture for the place the studying glass ought to be. If you draw, you may zoom and pan utilizing keyboard shortcuts, enhancing precision when engaged on smaller areas. Keyboard shortcuts embrace Alt+Wheel (Choice+Wheel in macOS) for zooming, Ctrl+Wheel for adjusting brush measurement, “R” for resetting zoom, “S” for getting into/exiting the total display screen, and holding “F” whereas shifting the cursor to pan. When you completed creating the masks, you say “studying glasses” within the immediate textual content field and click on “Generate”.
When you suppose drawing a masks on the browser is just too troublesome, you should utilize different drawing instruments comparable to Photoshop to create a masks picture. Then on the “Inpaint add” tab to add the picture and the masks individually.
You can even set the batch measurement to create a number of photos directly, all based mostly on the identical immediate and enter. This lets you choose the very best output from a bulk of variations.
The above instance retains the unique picture however provides studying glasses utilizing the inpainting function by drawing roughly a construction of the glasses over the masked space of the picture. A number of the notable settings for inpainting embrace the masks blur (how far the pixels outdoors the masks could be modified), inpaint space (whether or not the masks means to maintain or to alter), and denoising power signifying the encircling space for producing the change.
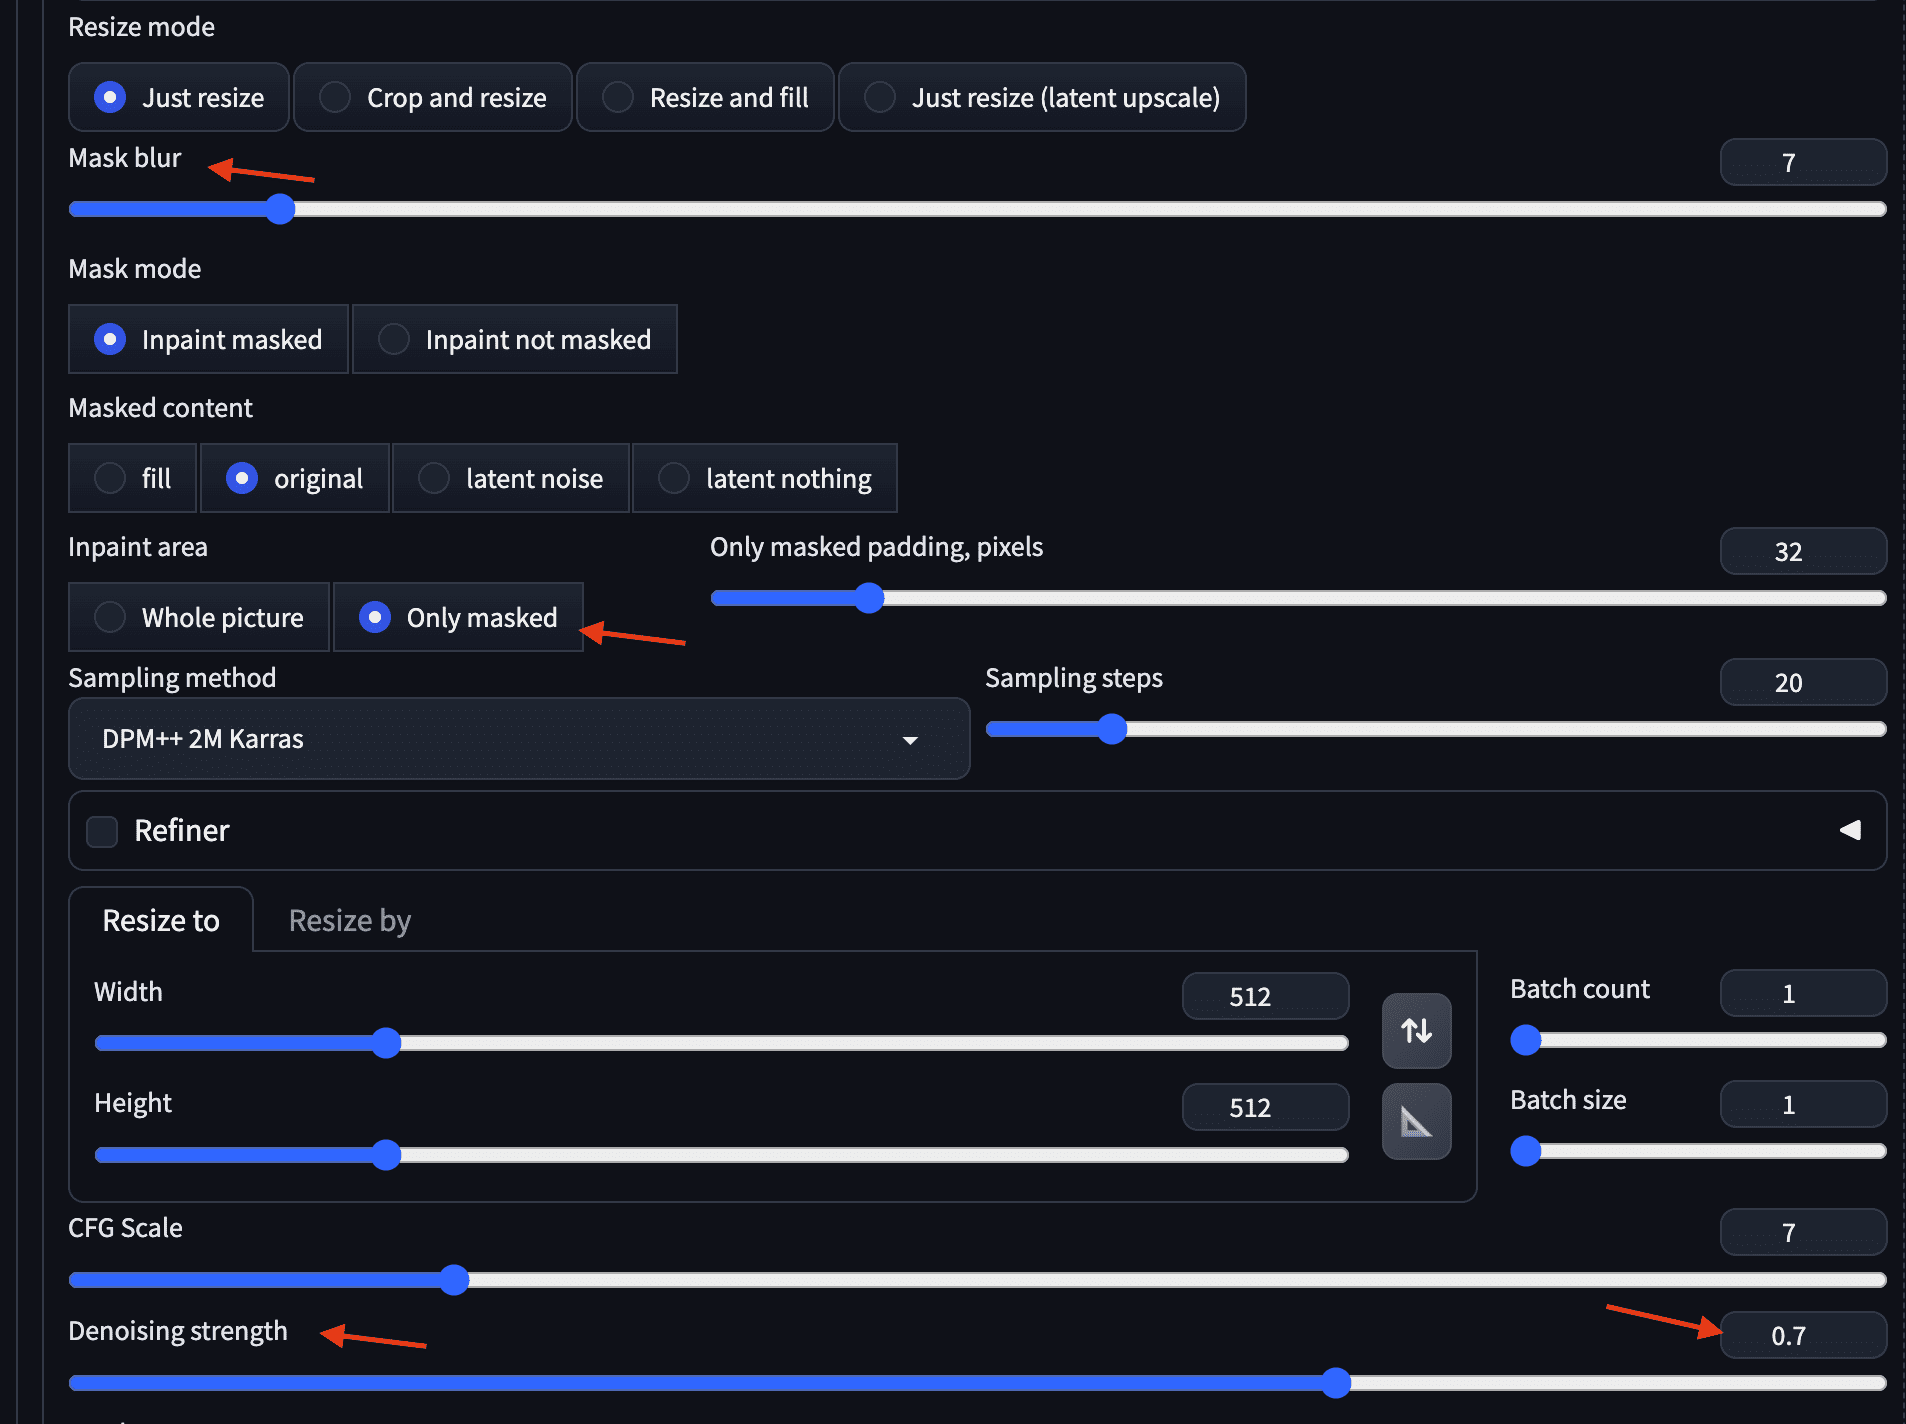
Some helpful parameters for inpainting
A extra superior model of inpainting is inpaint sketch. Whereas inpainting, you create a masks and solely the masked a part of the picture is regenerated based mostly on the immediate. In inpaint sketch, you draw on the picture with coloration pencils such that what you drew along with the immediate controls the output. For example, the identical studying glasses immediate generates a pair of glasses in crimson body as a result of the sketch was in crimson:
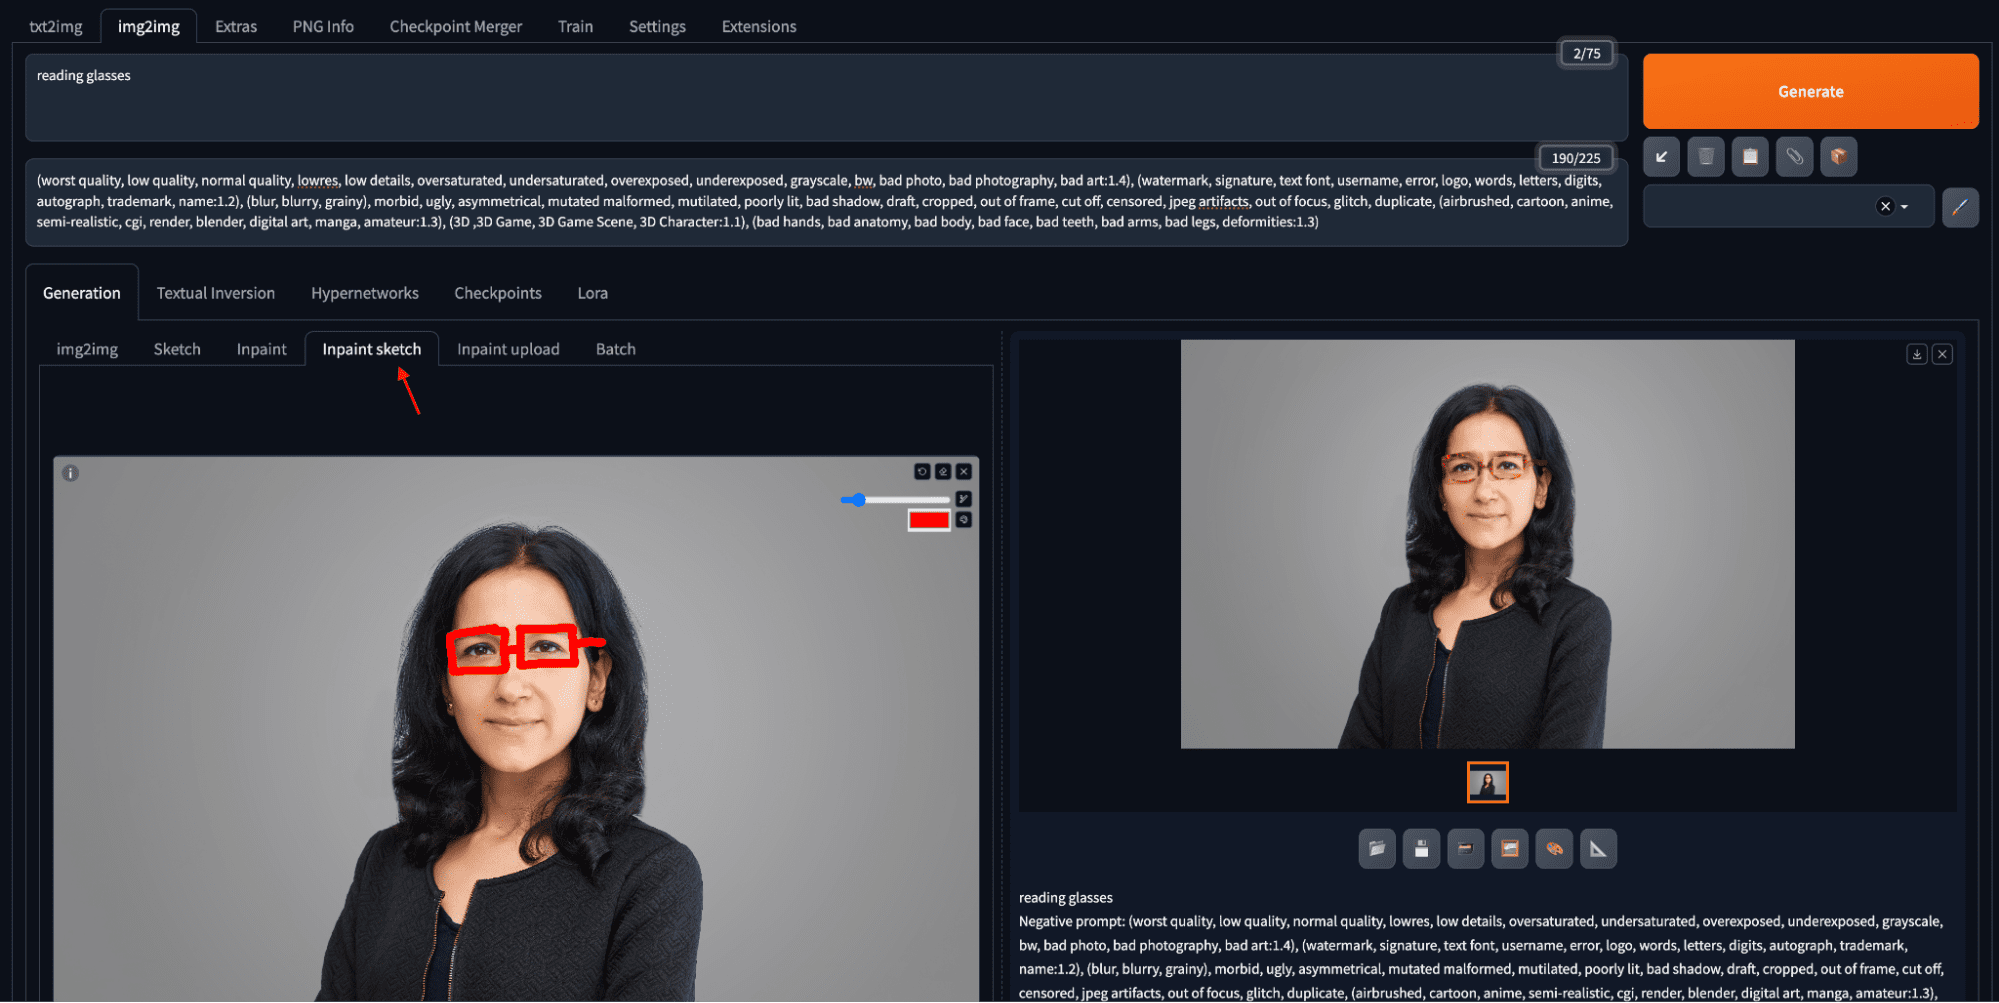
Studying glasses with crimson body is creating utilizing inpaint sketch
Different Features
As you already seen, the net UI has greater than txt2img and img2img. In actual fact, you may add extra options to the net UI by putting in extensions. Within the following, a number of the top-level tabs are:
Extras Tab: It can help you present a picture for resizing. Technically, you’re invoking solely the superresolution step of the pipeline.
PNG Information: When you generated a picture and saved it as PNG file in your disk, the main points of how this picture was generated are saved within the EXIF information of the picture. This software helps to retrieve parameter values comparable to prompts and settings from the generated photos that you simply add.
Settings Tab: Quite a lot of settings could be adjusted on this tab, together with the listing to fashions and outputs. Some of the helpful setting is “Face restoration”. This function applies a further mannequin designed to revive defects on faces. Customers can choose a face restoration mannequin within the Settings tab and apply it to each generated picture within the txt2img tab. Changes to the CodeFormer weight parameter can fine-tune the restoration impact.
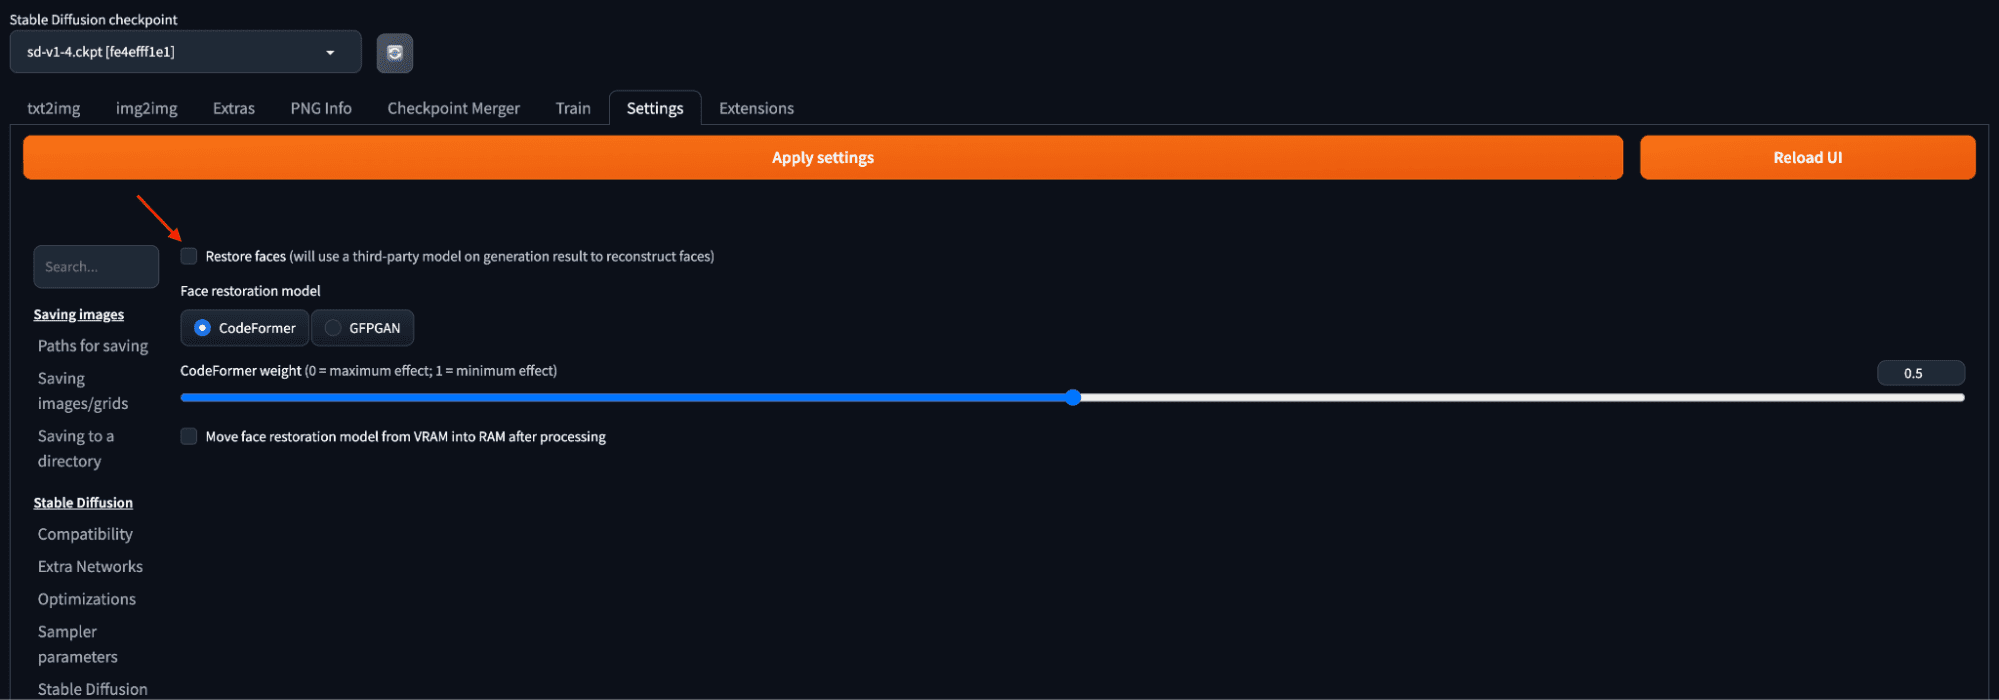
Face restoration settings utilizing CodeFormer mannequin.
Additional Readings
One of the best sources for studying concerning the net UI is the wiki web page of the software on GitHub:
Abstract
On this publish, you realized the right way to invoke the Secure Diffusion Internet UI out of your browser.
Whereas Secure Diffusion is such a strong software, it nonetheless lacks exact management over sure attributes of the output. It faces points surrounding degraded picture high quality and inaccurate colours in sure situations. You must keep in mind of its limitation once you use it. The world of AI-generated imagery is getting higher every day and quicker than ever. Within the subsequent publish, allow us to perceive some highly effective prompting strategies to stretch the boundaries of the generated photos.


")

")


/cdn.vox-cdn.com/uploads/chorus_asset/file/25661290/Screenshot_2024_10_06_at_10.48.36_AM.png "Trailers of the week: Nosferatu, The Franchise, and Squid Game 2")


