

Inpainting and outpainting have lengthy been widespread and well-studied picture processing domains. Conventional approaches to those issues typically relied on complicated algorithms and deep studying strategies but nonetheless gave inconsistent outputs. Nonetheless, latest developments within the type of Secure diffusion have reshaped these domains. Secure diffusion now provides enhanced efficacy in inpainting and outpainting whereas sustaining a remarkably light-weight nature.
On this publish, you’ll discover the ideas of inpainting and outpainting and see how you are able to do these with Secure Diffusion Internet UI.
Let’s get began.
Inpainting and Outpainting with Secure DiffusionPhoto by Kelly Sikkema. Some rights reserved.
Overview
This publish is in 5 components; they’re:
Rules of Inpainting
Inpainting in Secure Diffusion Internet UI
Utilizing Inpaint Something Extension
Rules of Outpainting
Outpainting with Secure Diffusion Internet UI
Rules of Inpainting
Secure diffusion is a state-of-the-art Text2Image technology mannequin.
It’s a class of Latent Diffusion Fashions (LDM) proposed by Robin Robmach, et al. Educated initially on a subset of 512×512 photographs from the LAION-5B Database, this LDM demonstrates aggressive outcomes for varied picture technology duties, together with conditional picture synthesis, inpainting, outpainting, image-image translation, super-resolution, and way more!
Not like earlier diffusion fashions, which operated in pixel area (authentic picture), steady diffusion is utilized in latent area (compressed picture), requiring fewer computational sources whereas preserving particulars; this implies you possibly can run it in your native system fairly simply!
Secure diffusion is based on three parts:
1. Textual content Encoder
The textual content encoder transforms the textual content immediate into an embedding area, which is additional fed to information the denoising course of (we’ll get there shortly). Secure diffusion initially used a frozen, pre-trained CLIP ViT-L/14 to create embeddings; nevertheless, improved variants switched to OpenCLIP, which incorporates textual content fashions with parameter measurement 354M+ as in comparison with 63M parameters within the former CLIP. This enables the textual content immediate to explain the picture extra precisely.
2. U-Internet
U-Internet repeatedly transforms a flawed picture right into a cleaner type. It receives two varieties of inputs: noisy latents (which symbolize incomplete or distorted picture knowledge) and textual embeddings (derived from the enter textual content). These textual content embeddings include textual data that guides the U-Internet’s understanding of what the ultimate picture ought to ideally appear to be. The principle job of U-Internet is to foretell noise current within the enter and subtract it to generate denoised latents. Not like typical U-Internet architectures, consideration layers are additionally included that concentrate on particular components of the picture primarily based on textual data, enhancing the denoising course of.
3. Variational Auto Encoder (VAE)
The autoencoder’s decoder converts the U-Internet prediction (denoised latent illustration) again into the unique pixel area for creating the ultimate picture. Nonetheless, solely throughout coaching, does the autoencoder’s encoder compress the higher-dimensional picture (authentic) right into a lower-dimensional latent illustration as an enter to U-Internet after the noising course of. This compression creates a extra condensed type and ignores perceptually irrelevant particulars, enabling computationally environment friendly coaching.
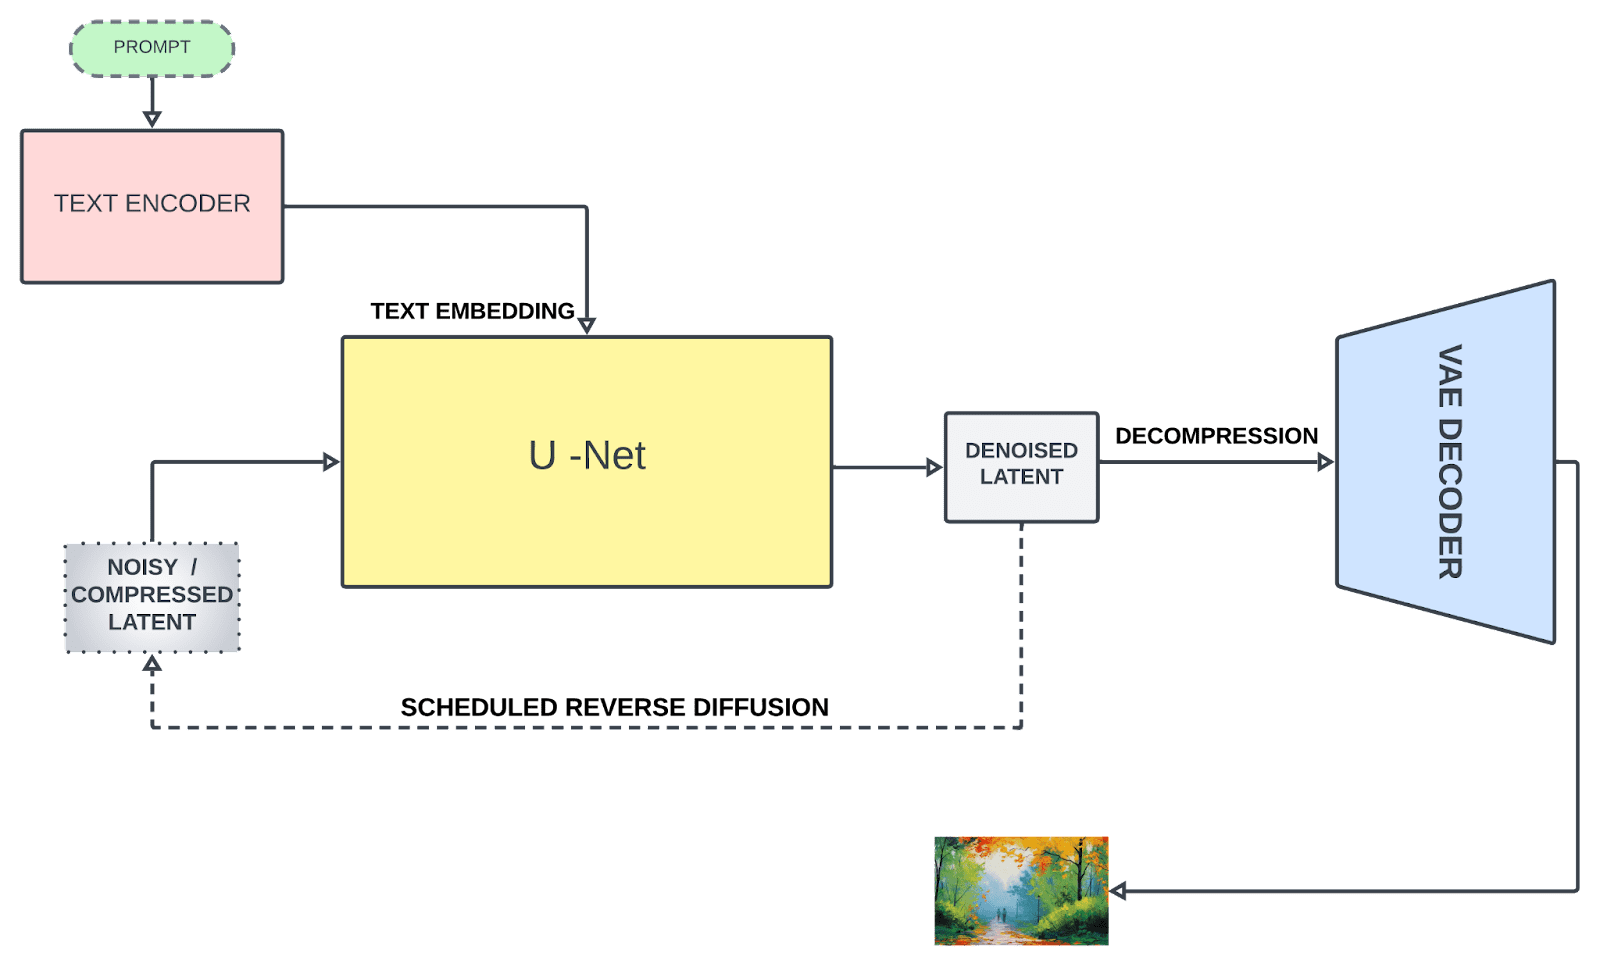
Secure diffusion structure
Inpainting is a well-liked picture processing method used to revive lacking pixels in a picture and even reconstruct a area of the picture whereas following the encompassing context (the wholesome pixels assist repair the corrupted pixels). That is an incredible characteristic of diffusion fashions. A typical inpainting course of includes:
Figuring out areas to be reconstructed/mounted. The areas will be masked (by a binary picture) for the algorithm to acknowledge them.
The algorithm then analyzes patterns and textures from surrounding pixels to inpaint semantically believable and constant areas.
Let’s talk about some necessary inpainting strategies:
1. Texture synthesis
This technique dissects the picture into small patches, analyzes their construction and texture, and identifies comparable patches inside the picture to fill the lacking area. Nonetheless, it calls for substantial computational sources and is appropriate for photographs with uniform and constant textures.
2. Exemplar-based
This technique concerned assessing priorities for every patch, choosing the best-matching patches, and subsequently using these patches to fill lacking areas primarily based on predefined priorities. It performs higher for lacking areas with easy texture and construction.
3. Diffusion-based
It makes use of a Partial Differential Equation (PDE) to diffuse the picture knowledge from surrounding pixels into the lacking area. It’s a quick and efficient strategy however as data diffuses from the encompassing areas, it could result in a lack of sharpness or tremendous particulars, leading to a blurred look within the reconstructed areas, particularly for bigger lacking areas.
Inpainting with Secure Diffusion Internet UI
By default within the Secure Diffusion net UI, you haven’t solely the txt2img but additionally the img2img characteristic. Recall that Secure Diffusion is to generate footage utilizing a stochastic course of, which step by step rework noise right into a recognizable image. Within the course of, you possibly can impose an situation primarily based on a immediate. The immediate is the textual content in txt2img, whereas in img2img, it may be the mixture of a picture and the textual content immediate.
One technique to do inpainting is to make use of the img2img tab within the Internet UI. Earlier than you begin, you want to put together an inpainting mannequin, which is totally different from the atypical Secure Diffusion mannequin. You’ll be able to, for instance, obtain the Secure Diffusion 2 inpainting mannequin from Hugging Face:
You’ll be able to merely obtain the safetensors file (be aware, that’s 5.2GB in measurement) and put it to the
fashions/Secure–diffusion listing. One other mannequin that you could be additionally discover it helpful (and smaller, of 2GB solely) is the epiCRealism Inpainting mannequin:
As you’ve got discovered the rules of the way to carry out inpainting. You want a technique to masks areas of the picture to be reconstructed and a succesful mannequin to fill the area with lacking pixels. In img2img tab, yow will discover the “inpaint” subtab which you’ll add a picture.
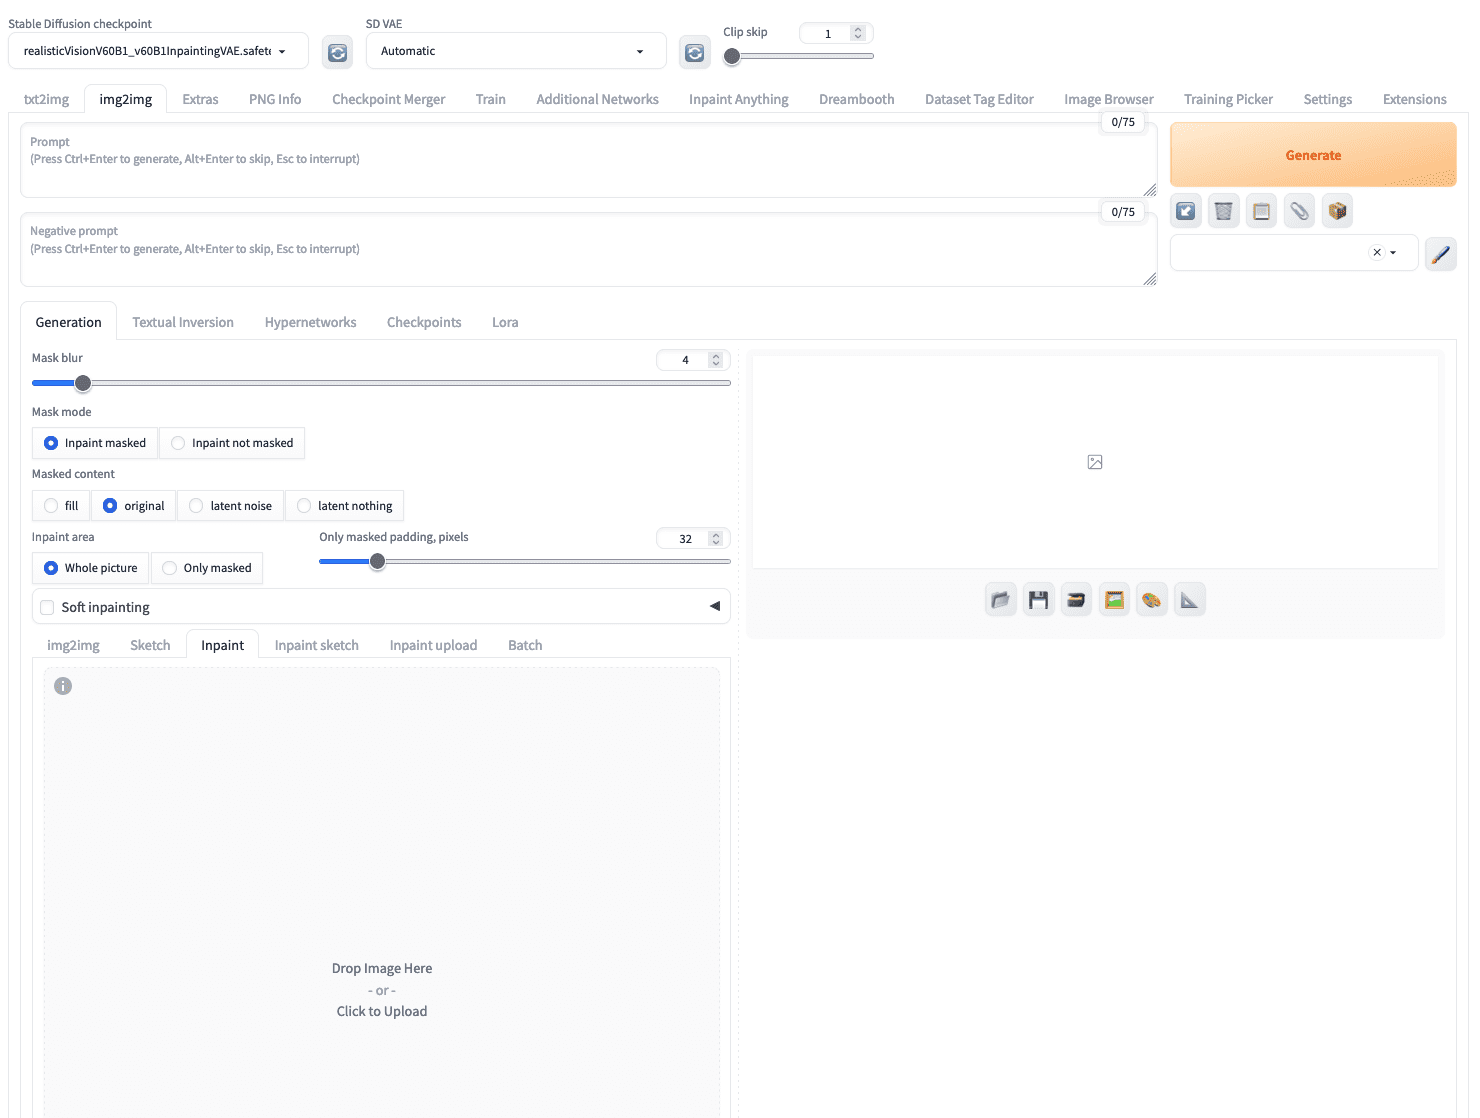
In Secure Diffusion Internet UI, you possibly can add a picture to the “inpaint” subtab below the “img2img” tab
Let’s strive with the next picture of a canine:
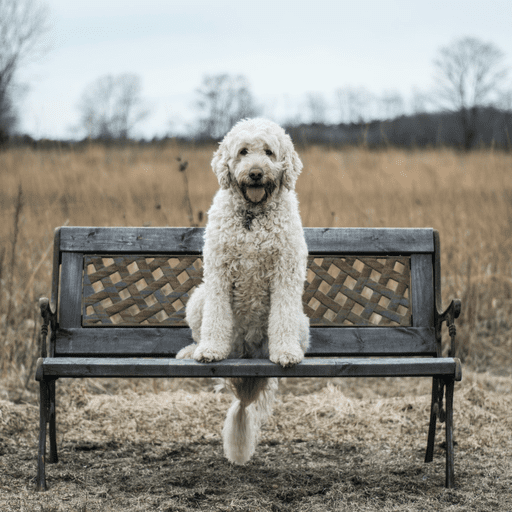
A canine picture for inpainting
After you uploaded this picture, you need to use your mouse to “paint” the canine out of the picture to create a masks. You need to use the icon on the high proper nook to set a bigger brush. Don’t fear for those who can’t mark the tremendous boundary of the canine within the picture, a bigger masks shouldn’t be an issue. For instance, that is what you may create:
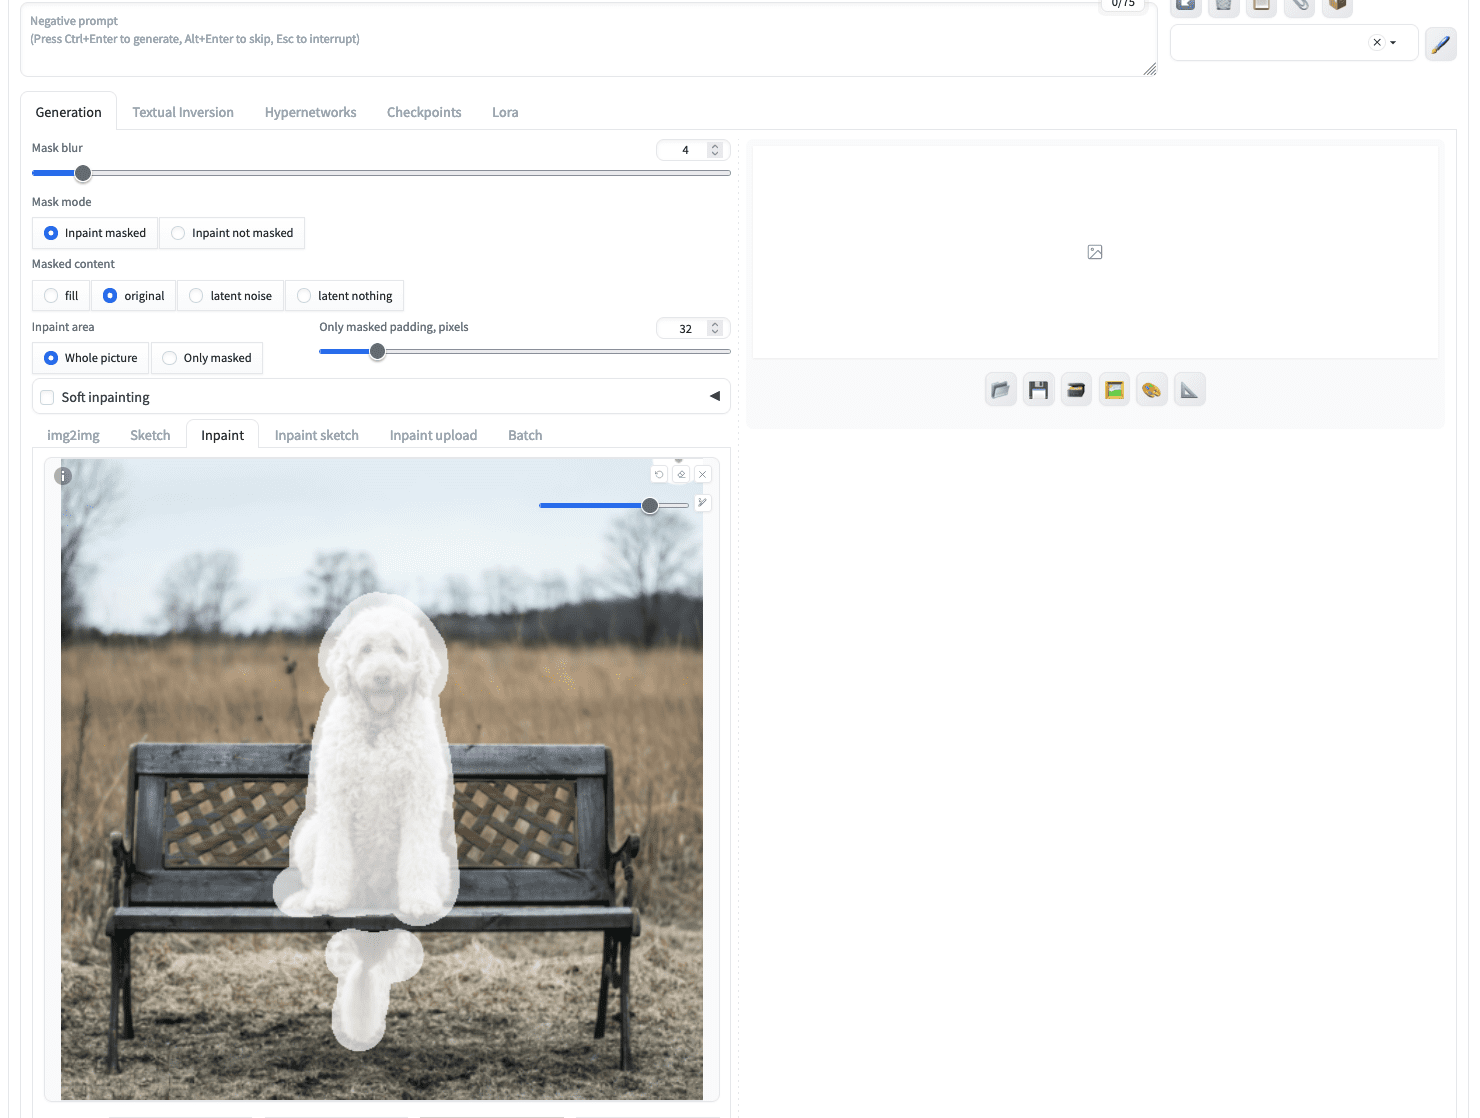
A masks created for inpainting
Should you click on generate instantly, you give the inpainting mannequin a free hand to create an image to fill within the masked space. However let’s put the next as a textual content immediate:
a gray cat sitting, excessive decision
Not essentially the most refined immediate, however sufficient to inform the mannequin what you need. Then, it’s best to choose an inpainting mannequin from the “Secure Diffusion checkpoint” dropdown on the high left nook. Afterward, clicking on the “Generate” button will provide you with precisely what you described:
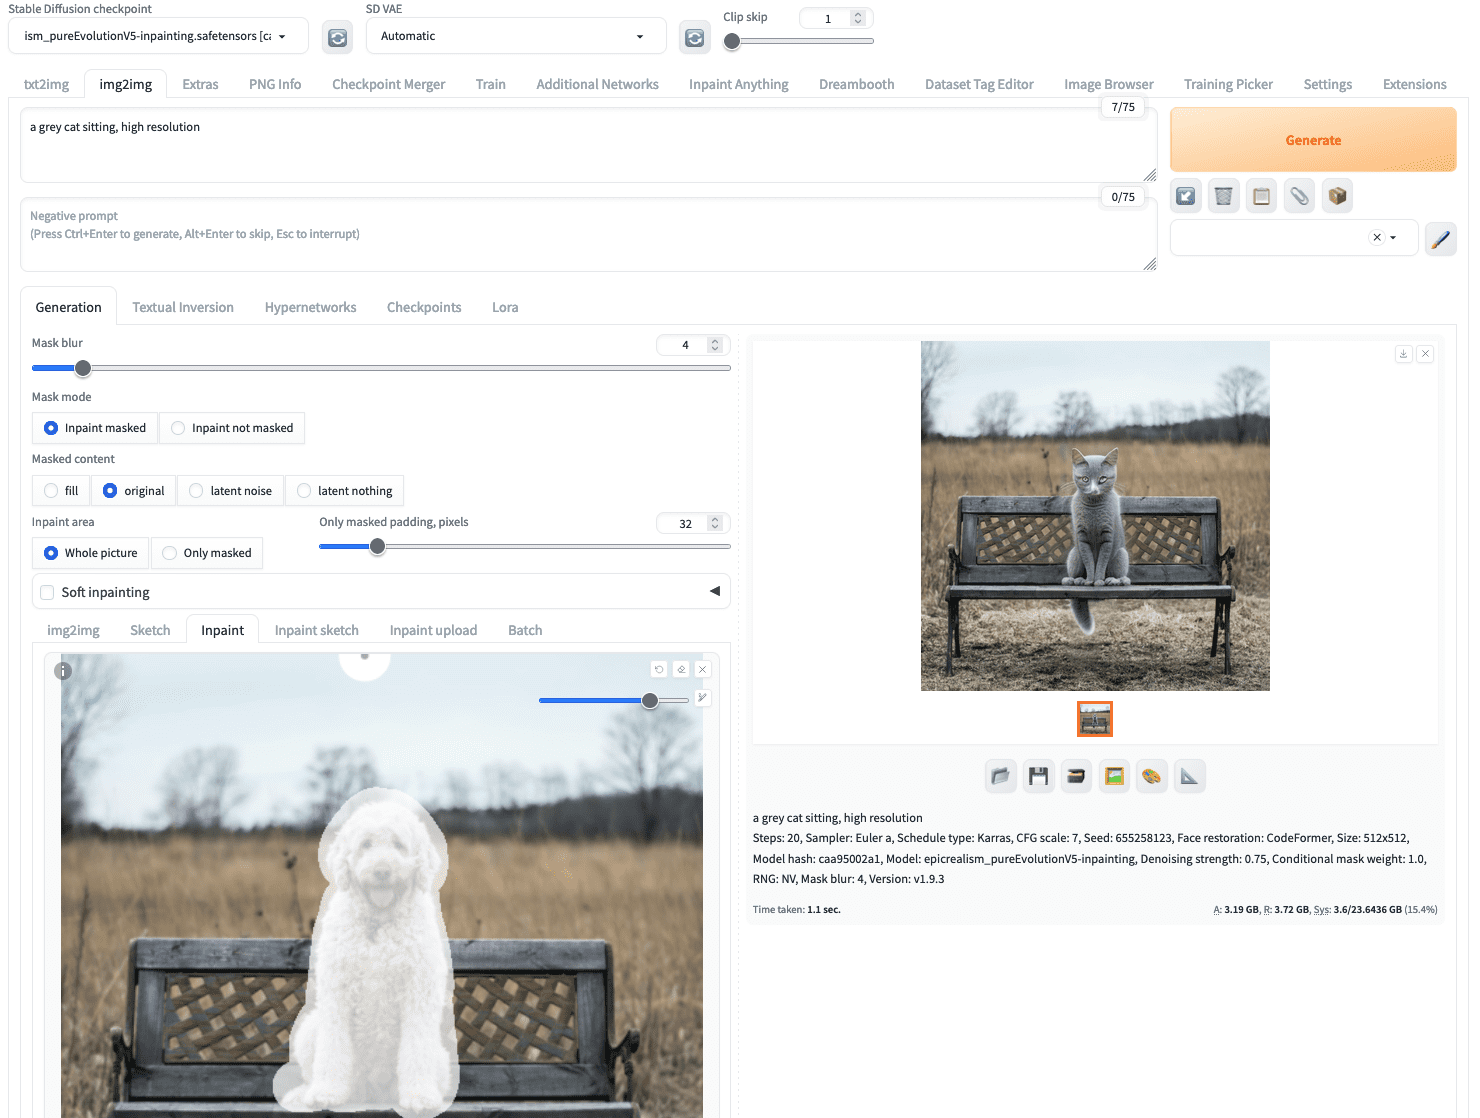
A photograph of a canine inpainted to change into a photograph of a cat
You might even see a unique consequence as a result of the picture technology course of is stochastic.
The parameters for picture technology additionally applies right here, together with the sampling technique (e.g., Euler) and sampling steps. However there are a number of further parameters you need to take note of:
The enter picture and the generated picture could also be in several side ratio. This impacts the standard of the output if resizing is required. You’ll be able to choose the resize technique (e.g., “Simply resize”, or “Crop and resize”). Deciding on “Simply resize” could distort the side ratio.
A masked picture is the place to begin of the Secure Diffusion mannequin. You’ll be able to select to fill the masked space with noise (“latent noise”), maintain the unique pixel content material (“authentic”), or just fill the masked space with the identical colour (“fill”). That is managed by the “Masked content material” possibility.
How a lot you need your output picture resemble the enter is managed by “Denoising power”. A worth of 0 will maintain the enter and a worth of 1 provides essentially the most freedom to the inpainting mannequin. The impact of this feature is most pronounced for those who choose “authentic” for “Masked content material” possibility
Utilizing Inpaint Something Extension
Making a masks on the picture for inpainting will be tedious, is determined by how complicated the masks is. You might discover there’s a “Inpaint add” subtab below “img2img” which you’ll add the picture and the masks as two picture information. That is useful for those who used different utility equivalent to Photoshop to create a masks.
Nonetheless, there’s a extra superior technique to create a masks, utilizing the “Inpaint Something” extension. That is to make the most of Meta AI’s SAM (Section Something Mannequin), a really robust picture segmentation mannequin, to generate masks for enter photographs.
To start out, you go to the “Extensions” tab of the Internet UI. Then on the “Obtainable” subtab, click on the “Load from” button and on the search bar above the desk, sort “inpaint something”. There ought to be just one extension match this title and you may set up it by clicking the “Set up” button. It is advisable to restart the Internet UI after you put in it.

Putting in the “Inpaint Something” extension
Inpaint Something extension will create a brand new top-level tab of the identical title. Firstly, you want to choose a SAM mannequin, for instance
sam_hq_vit_l.pth is used on this instance. It is advisable to obtain the mannequin earlier than the primary run.
To start out creating an inpainting, you possibly can add your picture just like how you’re employed within the img2img tab. Then, it’s best to click on “Run Section Something” button, which is able to create a section map on the proper, as follows:
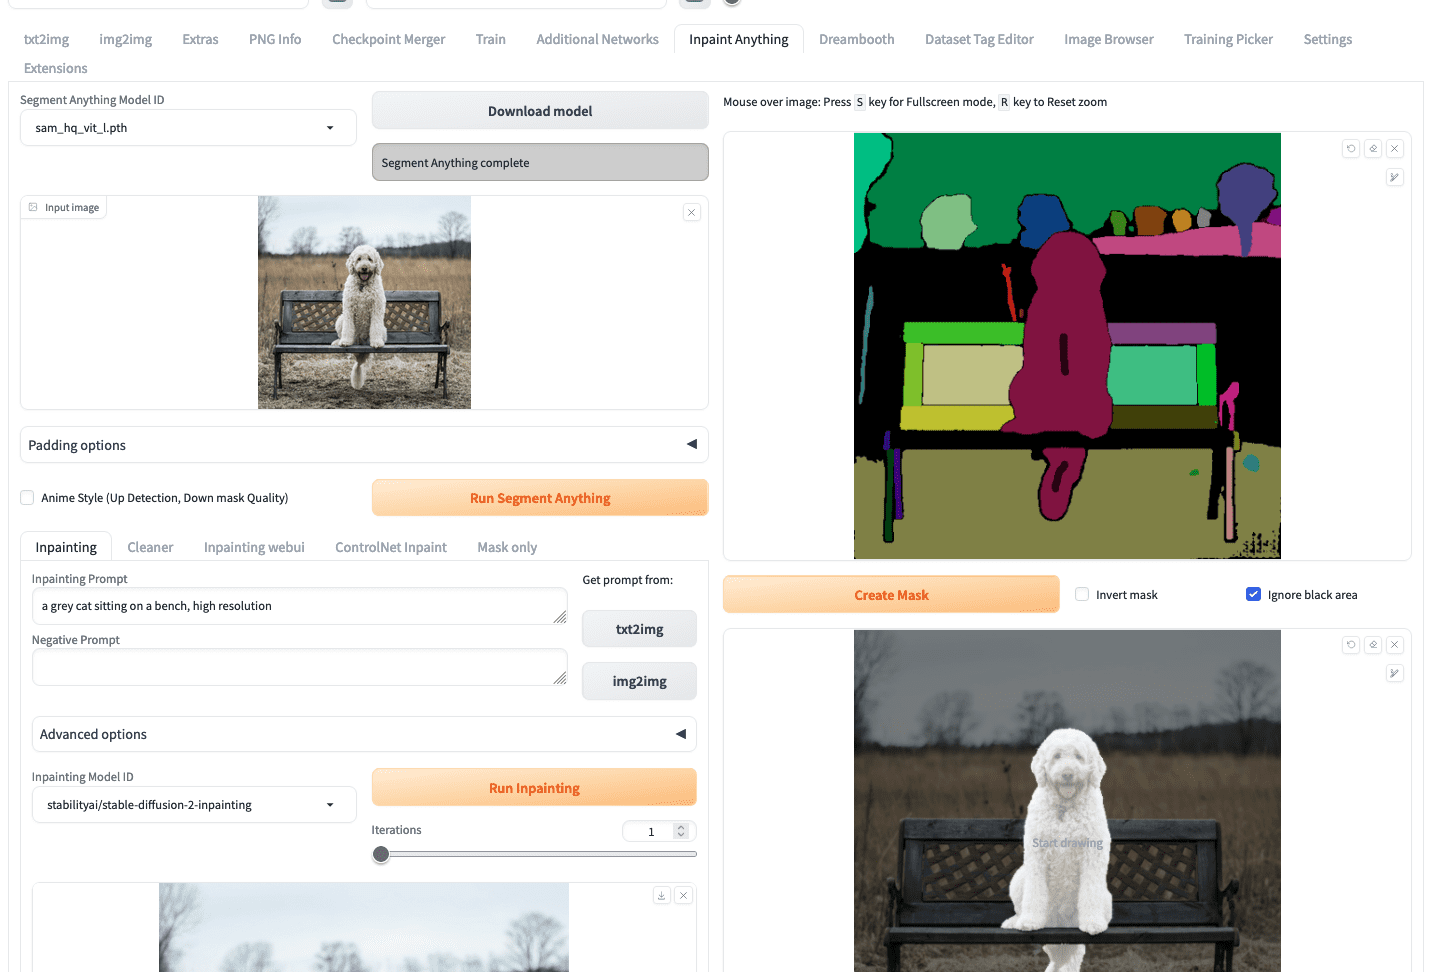
Utilizing Inpaint Something to create a masks
What you want to do subsequent is to make use of your mouse to attract a small scratch on the segments that correspond to the canine (the quick black strains on the chest and the tail of the canine as you noticed within the screenshot above). Then click on the “create masks” button will generate the masks beneath it. It’s simpler to create a masks this fashion then fastidiously define the area of the canine within the picture.
To run inpainting, you possibly can return to the left half of the display screen, enter the immediate, and click on “Run inpainting”.
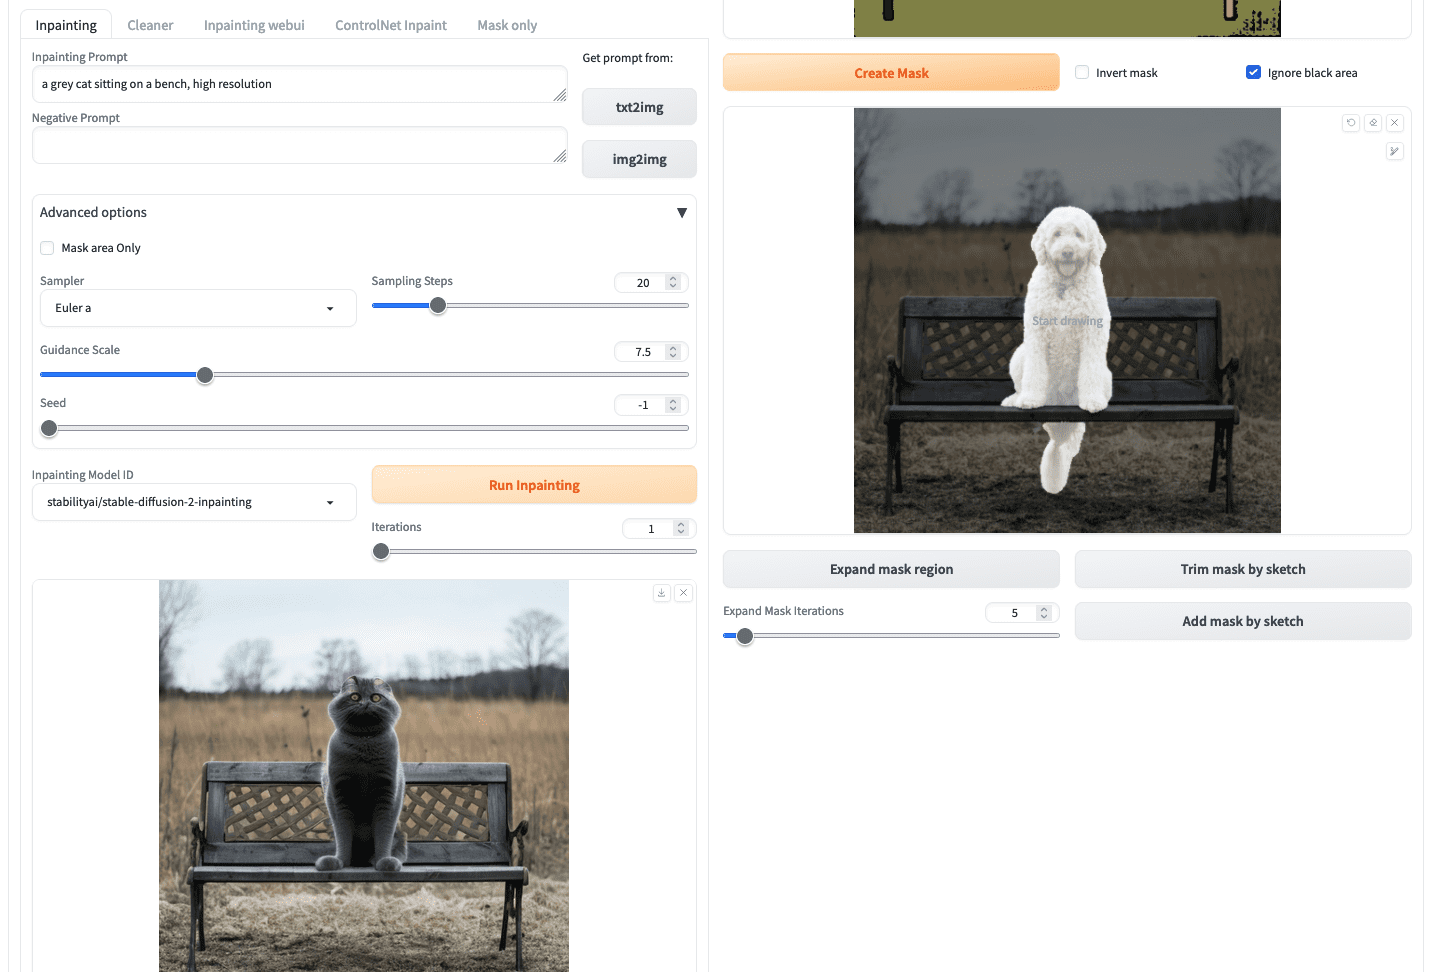
Inpainting consequence from “Inpaint Something”
Nonetheless, it’s best to discover that on this case, there are solely a number of fashions you possibly can choose from the dropdown “Inpainting Mannequin ID”. The mannequin stable-diffusion-2-inpainting is used within the instance above. These fashions should not rely upon the mannequin information you set within the
fashions/Secure–diffusion listing, however downloaded from the Hugging Face Hub the primary time you utilize it. It is a limitation of utilizing Inpaint Something extension. Should you insist to make use of the inpainting mannequin you ready, you possibly can retrieve the masks from the “Masks solely” subtab and reuse it within the “img2img” tab.
Rules of Outpainting
Whereas inpainting fixes or reconstructs the interior pixels of the picture, outpainting, an extrapolation method is simply the other of it because it expands the visible narrative of the picture by producing new (exterior) pixels for a picture that’s contextually per the unique picture. So now you possibly can prolong a picture past its borders!
Picture outpainting has been given much less consideration than inpainting, but some CNN and GAN-based approaches are nonetheless across the nook. A Stanford researchers’ strategy is kind of attention-grabbing. They employed a DCGAN, for its generator community. They maintained the encoder-decoder construction with further dilated convolutions to spice up realism by growing the native receptive area of neurons (accessible data to a neuron) as a result of growing the dilation issue enhances the receptive fields, whereas the discriminator community consists of native discriminators every working on a particular area in a picture and a concatenation layer combines all native outputs to provide a closing output. For extra understanding, undergo this useful resource receptive fields.
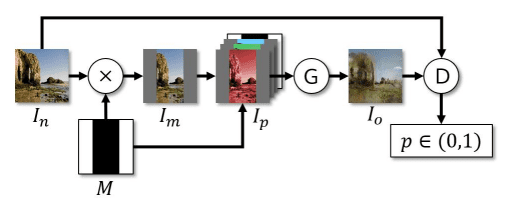
Coaching pipeline from Radford et al (2016)
Outpainting with Secure Diffusion
Outpainting means you present an enter picture and produce an output by which the enter is a subimage of the output. You’ll be able to, for instance, produce a half-body image from a head shot.
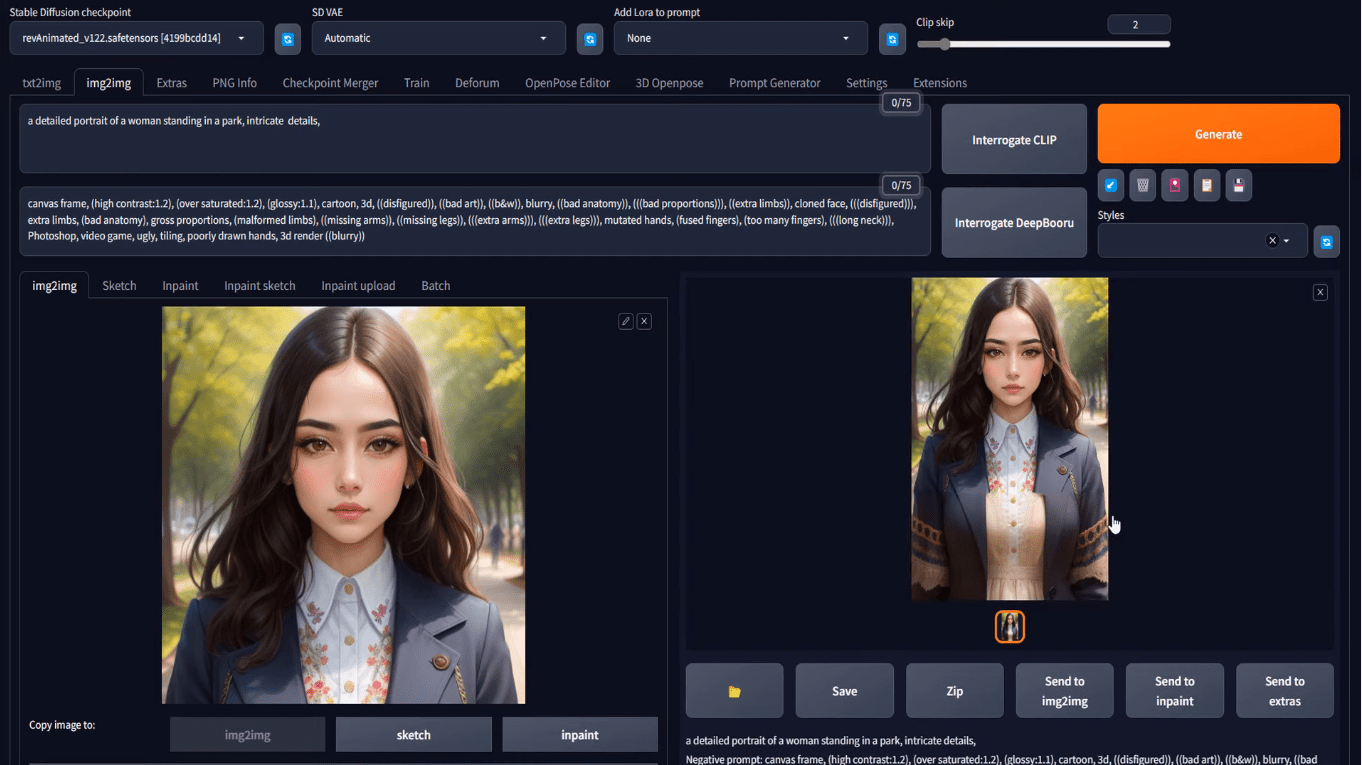
Let’s do this out utilizing Secure Diffusion Internet UI. You can begin your undertaking with img2img tab as within the earlier workflow. However you may as well generate a picture from txt2img, and switch to img2img. Let’s strive with the immediate to provide a head shot:
an in depth portrait of a girl standing in a park, intricate particulars
with acceptable Secure Diffusion mannequin and different parameters, you should have your output on the txt2img tab. Beneath the generated image, yow will discover a button that appears like an image body to imply “ship picture and technology parameters to img2img tab”. Click on on that you’ll convey the generated image to the img2img tab, like the next:

Loading the txt2img consequence into the img2img tab
At this level, it’s similar as you if uploaded your picture on the img2img tab.
You’ll be able to describe the anticipated output of outpainting by way of a immediate and even present a destructive immediate if wanted, within the two textual content fields at high. It is advisable to set the output measurement within the img2img tab. For instance, if the enter picture is 512×512 pixels, you possibly can set the output to 512×768 pixels.
Then, an important step is to scroll right down to the underside of the web page, on the “script” part, select Poor Man’s Outpainting or any outpainting script.
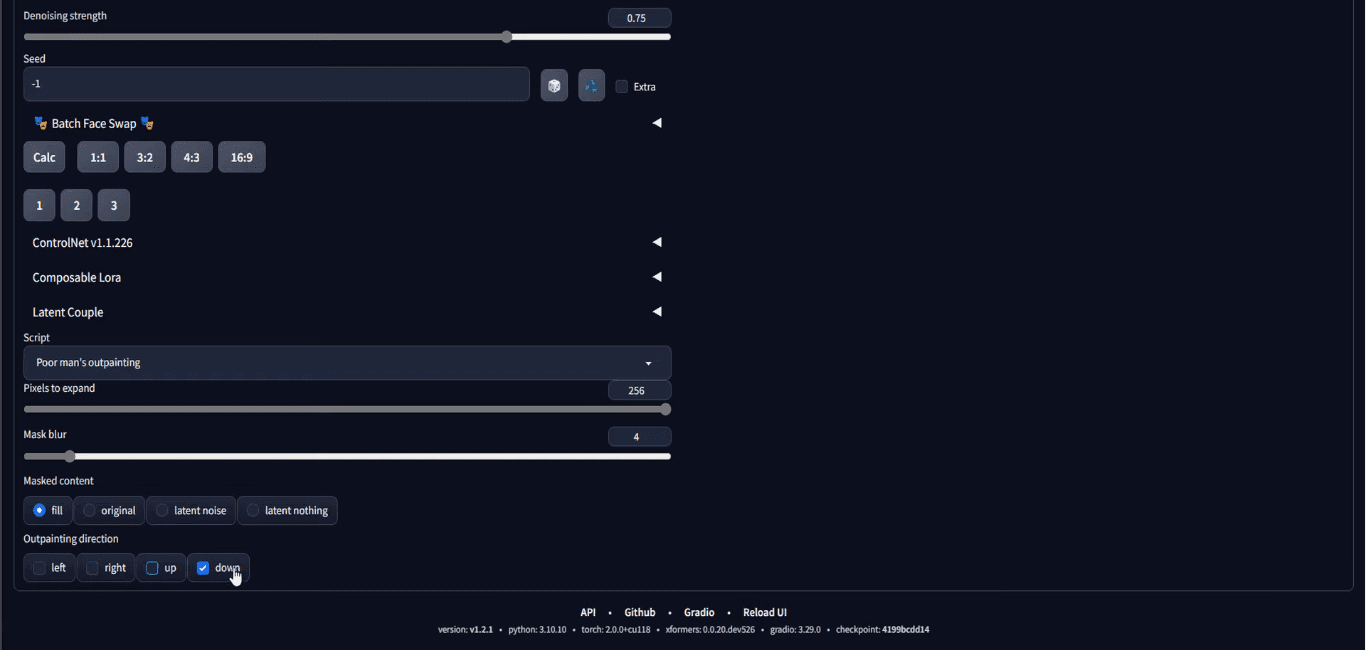
Choose “Poor man’s outpainting” at “Script” dropdown
It is advisable to set the variety of pixels to attract exterior of the boundary of the enter picture. You additionally must set the outpainting route that you simply need to broaden your picture in the direction of. Within the screenshot above, it’s set to outpaint solely on the downward route for 256 pixels. Word that, because the enter is 512×512 pixels and the outpainting will add 256 pixels on the backside, the output shall be 512×768 pixels, and that’s the reason we set the output measurement to be such.
When you end with all of the parameters, you possibly can click on “Generate” to get your output. Since randomness is concerned within the technology course of, chances are you’ll must generate the output a number of occasions till you’re proud of the outcomes. That is what chances are you’ll get:
Results of outpainting
Your output could not mix naturally with the unique picture. You need to play with denoising power and discover out what works finest for you.
That is your closing output. However nothing cease you from working this once more. (Discover the “Ship to img2img” button beneath your output?) You’ll be able to repeat this course of to create a full-body, however bear in mind you want to make the output “longer” to suit the output.
Options to Outpainting
Secure Diffusion demonstrates spectacular outpainting outcomes, however within the present generative AI wave, it’s value to say the opposite two opponents earlier than we end this publish. Nonetheless, solely Secure Diffusion is free!
Dall-E
Dall-E is developed by OpenAI, they’re additionally text2img fashions producing photographs primarily based on enter prompts, at the moment there are three variants Dall-E 1, Dall-E 2, and Dall-E 3. Dall-E’s outpainting maintains the context of a picture by considering the shadow, reflections, and textures of a picture.

Photos by Alphr
Midjourney
Midjourney bot is one other of the main picture turbines launched by Midjourney, an unbiased analysis lab, you possibly can entry it by way of their discord server. It has launched outpainting in its V5.2 by the title of the Zoom-out characteristic.
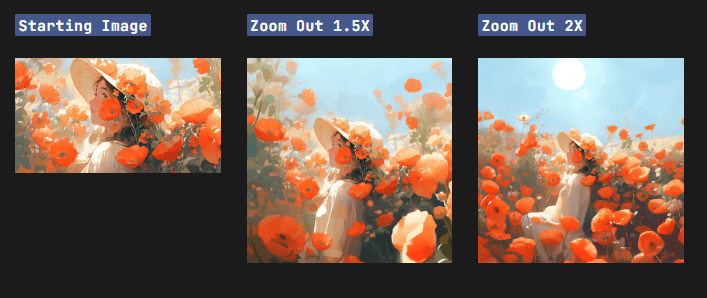
Picture by Midjourney
Additional Readings
This part supplies extra sources on the subject in case you are seeking to go deeper.
Abstract
On this publish, you’ve got discovered the fundamental structure of steady diffusion and its constructing blocks, particularly how they’re utilized to the duties of inpainting and outpainting. Secure diffusion has proved to be a robust instrument within the generative AI area. In addition to the txt2img technology, it’s additionally widespread for inpainting and outpainting. The online UI by automatic1111 is the go-to instrument for steady diffusion, you possibly can inpaint or outpaint with it utilizing the img2img tab.


")


")

")


/cdn.vox-cdn.com/uploads/chorus_asset/file/25661290/Screenshot_2024_10_06_at_10.48.36_AM.png "Trailers of the week: Nosferatu, The Franchise, and Squid Game 2")


